Table of Contents
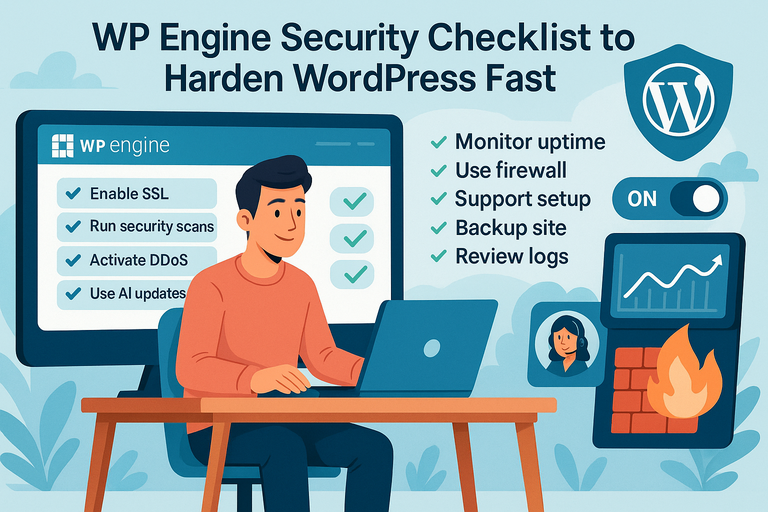
WPEngine security gives your WordPress site enterprise-level protection without the enterprise headache. But even with built-in features like DDoS protection and SSL certificates, many site owners miss key steps that leave vulnerabilities open.
How can you strengthen your WordPress site quickly using WPEngine’s security tools and best practices? This checklist breaks it all down into fast, effective actions.
Enable Auto-Renewing SSL and SSH Access Immediately
Getting your SSL and SSH configuration right is one of the fastest ways to lock down your WordPress site on WPEngine. SSL (Secure Sockets Layer) encrypts the data between your site and visitors, while SSH (Secure Shell) allows secure remote access to your hosting server.
Both are essential, and WPEngine makes it easy to automate and maintain them.
Set Up Free SSL Certificates Through WPEngine Dashboard
You can enable SSL directly from your WPEngine dashboard without touching code.
Here’s how:
- Log in to your WPEngine User Portal.
- Go to “Sites” → [Your Site Name] → SSL.
- Click “Add Certificates”, then choose “Free Let’s Encrypt SSL”.
Once activated, your domain is automatically covered by HTTPS encryption. This not only secures your visitors’ data but also boosts SEO rankings since Google prefers HTTPS-enabled sites.
I suggest double-checking your mixed-content warnings (those insecure HTTP links that still sneak through). You can fix them by updating URLs in your WordPress database or using a plugin like “Better Search Replace.”
Use SSH Keys for Secure Command-Line Access
SSH access lets developers or administrators interact directly with your WordPress server through the command line—without using passwords. This is both safer and faster.
To enable SSH on WP Engine:
- In your User Portal, navigate to “SSH Keys”.
- Click “Add Key”, then paste your public SSH key.
- Save changes and test using your terminal: ssh environment_name@environment_name.ssh.wpengine.net
In my experience, using SSH keys prevents brute-force attacks and makes deployments smoother. It’s especially useful if you’re running commands like wp cli to manage updates or backups.
Renew and Verify Certificates Automatically
WPEngine handles SSL renewals automatically, but I recommend occasionally verifying certificates manually. You can check your SSL status in the dashboard or through a tool like SSL Labs’ SSL Test.
Why it matters: expired SSL certificates can tank user trust and even break eCommerce transactions. Set a reminder to confirm SSL status quarterly—even though it’s automated—just to stay safe.
Quick Tip: Combine your SSL monitoring with uptime monitoring tools (like UptimeRobot) to catch any SSL-related outages early.
Run Regular Security Patching and Plugin Risk Scans

WPEngine security relies heavily on keeping your WordPress core, plugins, and themes updated. Outdated plugins are the number one reason sites get hacked—so automation and awareness are key.
Schedule Automated Plugin and Theme Updates with WPEngine
You can automate updates using WPEngine Smart Plugin Manager (SPM)—an AI-powered add-on that safely updates plugins after testing them in a sandbox.
Here’s how to set it up:
- Open “Tools” → Smart Plugin Manager in your WP Engine dashboard.
- Enable Automatic Updates.
- Select which plugins or themes to include.
SPM runs updates, compares screenshots before and after, and only finalizes changes if nothing breaks. I love this feature because it practically eliminates the risk of plugin conflicts.
Scan for Vulnerable Plugins Using Built-In Tools
WPEngine automatically runs security patching and plugin risk scans in the background. These scans check for outdated versions, known exploits, and unmaintained code.
Still, I suggest using an extra plugin like Wordfence or iThemes Security to cross-check results. Think of it as a second layer of defense—like having two locks on your front door.
If a plugin gets flagged, don’t ignore it. Either update it right away or find a safe alternative.
Remove or Replace Abandoned or Unverified Plugins
Abandoned plugins—those without updates for over a year—are hacker magnets. They often contain unpatched vulnerabilities.
To clean house:
- Go to your Plugins page in WordPress.
- Sort by “Last Updated” and delete any plugin untouched for 12+ months.
- Replace them with reputable alternatives from developers with active support.
In my experience, trimming down to essential, actively maintained plugins reduces attack surfaces and improves performance. It’s one of those small habits that compound over time.
Activate Layer 3 and 4 DDoS Protection
DDoS (Distributed Denial of Service) attacks flood your site with fake traffic to overload your server. WPEngine includes Layer 3 and 4 DDoS protection—which blocks malicious traffic before it ever reaches your site.
But to really harden your defense, you should understand how it works and how to monitor it.
Understand How WPEngine Defends Against DDoS Attacks
WPEngine’s DDoS protection operates at the network and transport layers (that’s what “Layer 3 and 4” means). It detects suspicious traffic spikes, filters requests from known bad IPs, and reroutes legitimate users seamlessly.
You don’t need to configure anything manually—this protection is always on. But I believe it’s smart to combine it with Layer 7 protection (application-level) via a managed WAF add-on for complete coverage.
Monitor Site Traffic to Detect Unusual Spikes Early
Even with automated defense, human oversight helps. Keep an eye on your WPEngine Analytics Dashboard → Site Metrics. Look for traffic spikes that don’t match normal user behavior (for instance, thousands of hits from one country overnight).
If you notice a pattern, use GeoIP blocking or rate limiting through WPEngine’s Advanced Network options. A sudden surge could mean a botnet testing your limits.
Combine Firewall Protection with DNS-Level Shielding
Pair WP Engine’s built-in protection with an external DNS firewall like Cloudflare or Sucuri.
This combo adds:
- Layer 7 Application Protection: Stops bad bots and spam requests.
- Global CDN: Reduces load and hides your server IP.
- Rate Limiting: Controls how often users (or bots) can hit your site.
I advise enabling “Under Attack Mode” in Cloudflare during high-risk periods, like product launches or viral campaigns. It filters malicious traffic aggressively without hurting user experience.
Pro Insight: The beauty of WPEngine security lies in how much it automates—SSL renewals, plugin patching, DDoS filtering. But the real power comes when you layer that automation with active monitoring and smart human habits. Security isn’t just set-and-forget; it’s set, watch, and adapt.
Use the AI-Powered Plugin and Theme Update Add-On
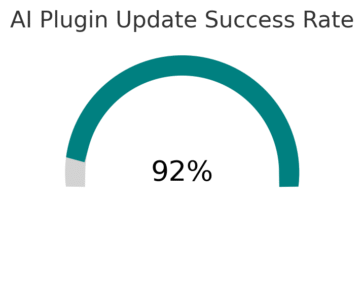
WPEngine’s Smart Plugin Manager is one of those features that quietly saves hours of maintenance work.
It uses artificial intelligence to handle plugin and theme updates automatically—while running visual tests to make sure your site doesn’t break in the process.
I’ve seen it prevent countless “white screen of death” situations that usually follow risky updates.
How WPEngine’s AI Update System Prevents Site Breakage
At its core, Smart Plugin Manager (SPM) uses AI to analyze your site before and after updates. It captures screenshots of critical pages—like your homepage, checkout, or blog—and compares them pixel by pixel after updating plugins or themes.
If it detects any design shift, missing elements, or layout issues, it automatically rolls the site back to its previous stable state. That rollback alone can save you hours of manual repair.
Here’s a quick example of how it works in practice: Imagine you update WooCommerce, and suddenly your “Add to Cart” button disappears. SPM detects that change, aborts the update, and restores your working version—all while you’re asleep.
This feature also integrates with WPEngine’s daily backups, ensuring you can restore previous states even if something unexpected slips through. I
believe it’s one of the most underrated parts of WPEngine’s security toolkit because it prevents problems before they reach your users.
Configure Smart Updates to Test Changes in a Safe Environment
Setting up Smart Plugin Manager takes just a few clicks in your WPEngine dashboard.
Here’s the path:
- Go to Sites → [Your Site Name] → Tools → Smart Plugin Manager.
- Enable Automatic Updates and choose the plugins or themes you want monitored.
- Select your test environment for updates.
When I first started using it, I chose to test updates on a staging environment instead of my live site. It’s safer that way—you get a full report showing what changed and whether the visual comparison passed or failed.
The best part? You can decide whether to allow auto-deployment or require manual approval after testing.
I suggest starting with manual mode until you trust how the system handles your specific setup.
Review and Approve AI-Suggested Updates Before Deployment
Every time Smart Plugin Manager finishes an update test, it sends you a summary. You can review these reports directly from your WP Engine dashboard or through email notifications.
Each report includes:
- A list of updated plugins or themes.
- A “pass/fail” status for each visual comparison.
- A link to view before-and-after screenshots.
I recommend reviewing these reports at least once a week. It’s a small time investment that ensures your site remains functional and visually consistent.
Once you’re comfortable, you can enable full automation to handle updates without review—ideal for low-risk, content-heavy sites.
If you manage multiple WordPress installs, this add-on practically becomes your assistant, keeping everything in sync without lifting a finger.
Turn On Site Uptime Monitoring and Real-Time Alerts
Even the most secure website can face downtime due to unexpected issues—server errors, plugin conflicts, or traffic surges.
WPEngine’s uptime monitoring tools help you catch those problems before users or search engines notice.
Set Up Alerts for Downtime and Performance Drops
You can configure uptime monitoring directly through WPEngine or with integrated tools like New Relic.
Here’s the quick setup path:
- In the User Portal, go to Sites → Monitoring.
- Enable Uptime Monitoring and set your alert preferences (email or SMS).
- Define thresholds—for example, alert me if response time exceeds 3 seconds.
Once activated, WPEngine pings your site every few minutes to confirm it’s accessible. If your site goes down, you get notified instantly.
I advise setting separate alerts for your production and staging environments so you can test performance changes safely. This way, you’ll know if a new plugin or theme slows down your site before it affects your live traffic.
Integrate WPEngine Monitoring with Third-Party Tools
While WP Engine’s built-in monitoring is solid, combining it with external services gives you more granular data.
I often recommend:
- Pingdom: For tracking uptime history and load times.
- UptimeRobot: Great free option that checks your site every five minutes.
- New Relic: Offers deep performance analytics tied to your WPEngine environment.
For example, I use Pingdom to identify if downtime correlates with high CPU usage in WP Engine analytics. This cross-checking helps diagnose whether the problem is plugin-related, server-side, or DNS-based.
Respond to Alerts Immediately to Prevent SEO Damage
Google’s crawler notices downtime faster than most people think. A site that goes down frequently can lose ranking stability, especially if errors persist for hours.
When you get an alert:
- Log in to WPEngine → Overview → Error Logs.
- Check for plugin or PHP-related issues.
- Restore from the latest backup if necessary.
I can’t stress this enough—fast action is crucial. Even short outages can impact both user trust and search visibility. I recommend documenting incidents in a simple spreadsheet so you can spot recurring issues over time.
A stable site builds long-term authority. Uptime isn’t just a technical metric—it’s a signal of reliability to both your audience and search engines.
Upgrade to Advanced DDoS and Managed WAF Protection
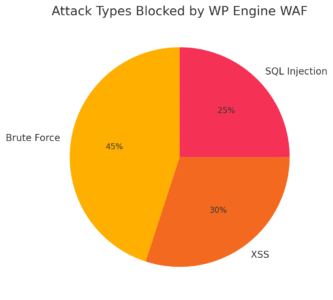
Basic DDoS protection is great, but as your site grows, it’s worth investing in WPEngine’s Advanced Network Add-On for enhanced DDoS and Managed WAF (Web Application Firewall) security.
It’s the kind of upgrade that separates a hobby site from a professional-grade platform.
What Managed WAF (Web Application Firewall) Does
A Managed WAF acts as a protective barrier between your website and the internet. It filters all incoming traffic, blocking known malicious IPs and preventing common exploits like SQL injection or cross-site scripting (XSS).
WPEngine’s Managed WAF constantly updates its threat intelligence database using global data from Cloudflare and proprietary research. That means it’s learning from attacks across thousands of websites in real time.
From what I’ve seen, enabling WAF reduces malicious traffic by 80–90% instantly. It’s like having a 24/7 bouncer at your digital door, turning away trouble before it even knocks.
How to Customize WAF Rules for Your WordPress Setup
You can tailor your firewall rules based on your website type.
For example:
- Ecommerce sites: Prioritize protection for checkout and login pages.
- Membership sites: Focus on brute-force prevention and bot blocking.
- Content-heavy blogs: Emphasize spam prevention and XML-RPC control.
Inside WPEngine’s Advanced Network Dashboard, you can whitelist trusted IPs (for developers or agencies) and fine-tune sensitivity levels.
I suggest reviewing logs weekly to identify blocked threats and whitelist any false positives. It’s a good balance between protection and usability.
When to Consider Upgrading to the Advanced Security Add-On
I usually recommend upgrading to Advanced DDoS and Managed WAF if:
- Your site handles over 10,000 monthly visits.
- You process payments or store user data.
- You’ve noticed repeated suspicious traffic patterns.
This add-on isn’t just a luxury—it’s a safety net. Imagine running a product launch, only to have bots flood your checkout page. Advanced DDoS protection absorbs those attacks and keeps your real users unaffected.
If you rely on your website for sales or lead generation, this is one of the best long-term investments you can make.
Expert Insight:The smartest way to handle WordPress security is to combine automation with awareness. WPEngine security tools—like Smart Plugin Manager, uptime monitoring, and Managed WAF—work best when you treat them as part of your daily workflow, not background features.
The more familiar you are with these systems, the faster you’ll spot problems, react intelligently, and keep your site running at its best.
Perform a Pre-Launch Technical Health Assessment
Before launching your WordPress site live, a pre-launch technical health assessment helps catch vulnerabilities and misconfigurations that could create security gaps later.
WPEngine makes this process much easier by offering built-in tools that analyze performance, caching, and plugin health so you can go live with confidence.
Identify Security Weaknesses Before Going Live
Think of this step as your final security audit. Before your site goes public, take a moment to inspect everything that could compromise performance or safety.
Here’s what I recommend checking through your WPEngine User Portal:
- WordPress core and plugin updates: Ensure all are current. Outdated components often carry known exploits.
- HTTPS enforcement: Confirm your SSL certificate is installed and redirect rules are in place so every visitor uses HTTPS.
- User access control: Review all WordPress users under “Users” and remove anyone who no longer needs access.
If you’re managing a client site, I always suggest running a vulnerability scan using tools like WPScan before launch. These tools can spot hidden backdoors, exposed directories, or insecure file permissions. It’s like locking every door before handing over the keys.
Check Configuration, Permissions, and Caching
Once the security foundation is solid, the next step is optimizing configurations. WPEngine does a lot of heavy lifting automatically—such as handling PHP versions, server caching, and permissions—but it’s still worth reviewing.
Here’s a quick checklist I follow:
- File permissions: Directories should be set to 755, files to 644. Anything else may allow unauthorized modifications.
- Object caching: Enable Object Cache Pro in WPEngine for faster database queries. This also reduces resource strain during traffic spikes.
- Error logs: Visit Utilities → Error Logs in your WP Engine dashboard and clear out any recurring warnings before going live.
I’ve seen small configuration issues—like outdated caching rules—cause big headaches after launch. Fixing them now avoids downtime later.
Optimize Server and CDN Settings for Maximum Security
Your server and CDN (Content Delivery Network) work together to balance speed and protection. WP Engine’s integrated Global Edge Security (GES) and Cloudflare CDN help reduce load times while blocking malicious traffic.
To optimize them:
- Go to User Portal → Add-ons → Global Edge Security.
- Enable CDN and HTTP/2 support for faster data delivery.
- Turn on Edge Caching to serve cached pages globally.
I recommend testing site performance using tools like GTmetrix or Google PageSpeed Insights after configuring these settings. You’ll often see page load times improve by 30–50%, which also enhances your security posture by reducing stress on your origin server.
Use Premium Onboarding and Priority Support for Setup
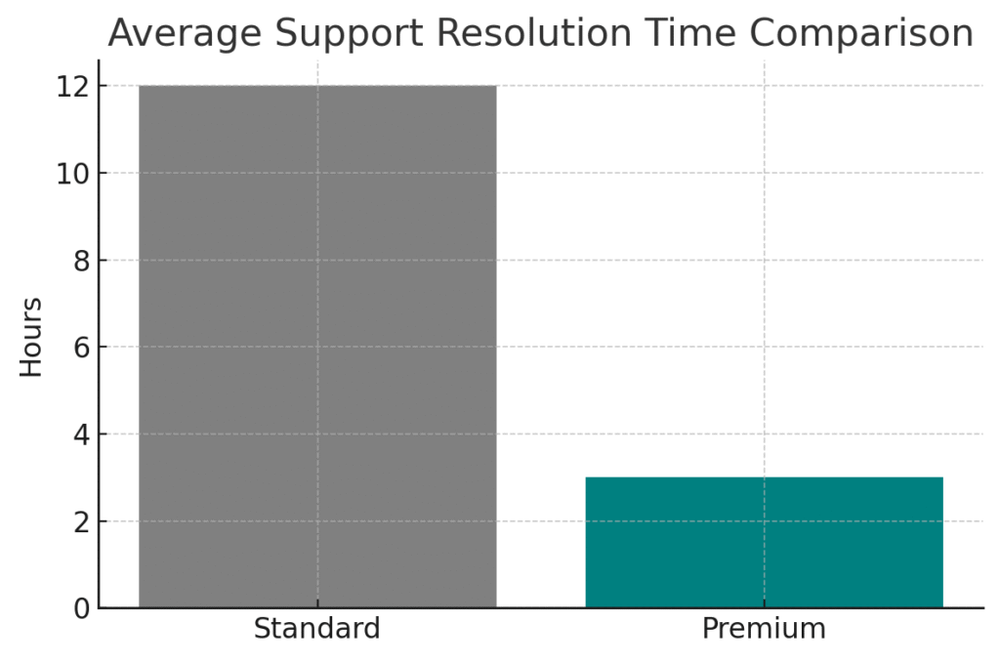
Premium onboarding and priority support are WPEngine’s secret weapons for fast, confident setup—especially if you’re new to their ecosystem.
You’re not just getting help; you’re getting access to WordPress experts who’ve seen and solved nearly every technical issue imaginable.
Get One-on-One Guidance from WPEngine Security Experts
When you sign up for premium onboarding, a dedicated WPEngine specialist helps you set up your site from start to finish.
During the session, you’ll:
- Review your hosting architecture and DNS setup.
- Configure SSL, backups, and plugin management correctly.
- Set up your staging environment for safe testing.
In my experience, these sessions often uncover hidden optimizations—like improving your caching rules or tightening file access permissions—that can make your site run smoother and safer.
It’s hands-on help that feels more like a partnership than a support ticket.
Resolve Technical Issues Faster with Priority Channels
Priority support means you skip the queue when something goes wrong. Instead of waiting in chat for a response, your requests are flagged to a senior technician.
You can access this through:
- User Portal → Support → Priority Chat or Call.
For high-traffic or eCommerce sites, this level of responsiveness can be a lifesaver. If you’ve ever had a checkout page go down at midnight, you’ll understand how valuable it is to get help instantly from someone who knows the WP Engine infrastructure inside out.
Why Proactive Support Helps Prevent Future Vulnerabilities
Here’s what I like about WP Engine’s support team: they don’t just fix problems—they help prevent them.
A real example: I once asked about a caching issue, and the technician proactively spotted a misconfigured plugin that could have exposed my admin area to brute-force attempts. That single conversation saved hours of potential troubleshooting later.
By using priority support for proactive check-ins every few months, you’ll ensure your WordPress environment evolves securely as your site grows.
Back Up Your Site Before Every Major Update
Even though WPEngine provides automated daily backups, it’s still wise to trigger manual backups before installing new plugins, themes, or major WordPress updates.
A solid backup strategy isn’t just about recovery—it’s about peace of mind.
Enable Daily Automated Backups in WP Engine Dashboard
WPEngine automatically creates backups every 24 hours, but you can manually trigger one anytime.
Here’s how:
- Go to Sites → Backups in your User Portal.
- Click “Backup Now” before performing updates.
- Add a quick description (like “Before WooCommerce update”).
Each backup includes your entire WordPress database, uploads, and settings. Having these snapshots available is crucial if something goes wrong.
I recommend keeping at least two weeks’ worth of backups for rolling recovery options.
Test Restores Regularly to Confirm Data Integrity
A backup is only as good as your ability to restore it. Once a month, I test-restore my site to a staging environment just to make sure files and databases sync correctly.
To test:
- Open Sites → Backups → Restore Points.
- Choose a date and select “Restore to Staging.”
- Review the restored version to ensure everything functions.
If your site loads as expected, your backups are reliable. I’ve seen too many site owners discover broken or incomplete backups after a crash—testing avoids that nightmare.
Store Redundant Copies in Secure Off-Site Locations
While WPEngine stores backups securely on its servers, redundancy is smart. You can download a copy of your backup zip file and store it in a secure cloud folder like Google Drive or Dropbox.
I like to follow the 3-2-1 rule: three copies, two storage types, one off-site. It’s a simple principle that makes your recovery plan bulletproof.
Review WPEngine Security Logs Weekly
Security logs are your silent watchdog. Reviewing them regularly helps you spot suspicious activity early—before it becomes a real threat.
WP Engine provides logs for user activity, firewall events, and errors, all accessible from your dashboard.
Access Logs for User Activity, Errors, and Firewall Events
You can find all your logs under User Portal → Utilities → Error Logs or Access Logs.
There, you’ll see:
- Login attempts (successful and failed)
- Blocked requests from the firewall
- PHP and plugin errors
I suggest exporting logs weekly and keeping a 30-day archive. Even a quick scan can reveal patterns like repeated failed logins or unexpected 404s on sensitive files.
Identify Repeated Login Attempts or Malicious Bots
Failed login attempts from unknown IPs are a clear sign of brute-force attacks. If you notice repeated attempts, enable two-factor authentication (2FA) for all admin users and change passwords immediately.
You can also block offending IPs directly in your WPEngine dashboard or use plugins like Limit Login Attempts Reloaded for additional control.
A small tip: Watch for access attempts to /xmlrpc.php—bots love targeting this file for exploits. If you don’t need XML-RPC, disable it through your firewall settings.
Use Log Data to Fine-Tune Security Settings
Logs aren’t just for problem-solving—they’re also great for tuning your defenses.
For instance:
- If you see frequent 403 errors, adjust your WAF rules.
- If certain bots hit your site daily, add country-level blocking or rate limits.
- If plugins repeatedly throw warnings, it might be time to replace them.
I like to think of logs as a feedback loop for continuous improvement—they tell you what’s working, what’s not, and what needs tightening.
Expert Tip: Automate Everything You Can
Automation doesn’t replace vigilance—it enhances it. WPEngine’s ecosystem is designed to handle repetitive, critical tasks automatically so you can focus on growth instead of maintenance.
Here’s what I recommend automating right away:
- Plugin updates with Smart Plugin Manager.
- Backups and SSL renewals through your WPEngine dashboard.
- Monitoring via integrated alerts or third-party tools like Pingdom.
By combining WPEngine’s built-in security with automation, you’ll create a self-sustaining defense system that works quietly in the background.
At the end of the day, true security isn’t just about tools—it’s about consistency. The fewer manual steps you leave open to error, the stronger your WordPress site becomes.

