Table of Contents
Setting up the Debutify theme Shopify store can feel like unlocking a new level in your eCommerce journey. This theme promises speed, conversion optimization, and sleek customization—but where should you start to get it right from the beginning?
In this complete starter guide, I’ll walk you through every step of the setup process so you can confidently launch a high-performing Shopify store using Debutify.
Installing And Activating The Debutify Theme On Shopify
Setting up the Debutify theme Shopify experience begins with the right foundation—installation.
Think of this step as laying the groundwork for everything your store will eventually become: fast, clean, and built to convert.
Choosing The Right Plan For Your Store
Before you dive in, it’s smart to choose a Debutify plan that actually fits your needs. Debutify offers a free plan (great for beginners) and several premium tiers with more add-ons and advanced features.
- Free plan – Ideal if you’re just testing your store concept. You’ll get the basic design and layout but limited customization.
- Starter or Growth plans – Better suited for small stores ready to scale with add-ons like product sliders and cart boosters.
- Pro plan – Designed for established stores focused on conversion optimization and speed.
I usually suggest starting with the free plan to get familiar with the interface. You can always upgrade once you see how the features help your sales performance.
How To Install Debutify From The Official Website
Installing Debutify takes just a few minutes. Here’s the simplest route I’ve found:
- Go to the Debutify official website and click “Add to Shopify.”
- Log into your Shopify store.
- Debutify will automatically appear under Online Store → Themes → Theme Library.
- Click “Customize” to begin editing.
It’s surprisingly quick, but don’t rush through. Make sure you’re logged into the correct Shopify store before linking the theme, as each license attaches to a single domain.
Activating Your Debutify License Key
Once installed, you’ll need to activate your license key. You’ll get this key via email when you sign up for Debutify.
Here’s how to do it:
- Go to Debutify App → Dashboard inside Shopify.
- Enter your license key in the provided field.
- Click “Activate.”
If you don’t activate your key, the premium features (like add-ons and advanced layouts) won’t appear. It’s a small but crucial step that gives your theme full functionality.
Verifying Installation Through The Shopify Dashboard
Finally, check your setup. In your Shopify admin panel:
- Go to Online Store → Themes.
- Ensure Debutify is listed as the Current Theme.
- Click “Preview” to see how it looks live.
I like to run a quick test by opening my store in incognito mode—just to make sure caching doesn’t hide any errors. If the design loads correctly and matches Debutify’s demo style, you’re ready for customization.
Customizing The Debutify Theme Layout For Branding
Once your Debutify theme is live, the real fun begins: making it feel like you. Your brand identity—logo, colors, typography—sets the emotional tone of your store.
Setting Up Logo, Colors, And Fonts That Match Your Brand
To start customizing, open Online Store → Themes → Customize.
- Logo: Upload it under Header → Logo image. Aim for a transparent PNG to blend seamlessly with your background.
- Colors: Choose your brand palette under Theme settings → Colors. Stick to 2–3 primary shades for consistency.
- Fonts: Navigate to Typography and pair readable fonts (like “Poppins” or “Lato”) for body text with a more distinctive headline font.
I suggest previewing changes in both desktop and mobile view. Consistent visuals across devices increase customer trust by up to 80%, according to Shopify data.
Adjusting Header, Footer, And Navigation Menus
A clear navigation layout is like a map—customers shouldn’t get lost.
- In Customize → Header, adjust your menu links (Home, Shop, Contact).
- For the Footer, add quick links, social icons, and newsletter signup.
- Use Navigation → Main Menu to reorder or rename links.
I usually test menu visibility by reducing my browser width. If important links disappear too early, it’s time to simplify your structure.
Personalizing Homepage Sections For Better Conversions
Debutify’s homepage is modular, meaning you can drag and drop sections to design your own layout.
Try this structure for high conversions:
- Hero Banner: Use a clear product image with a “Shop Now” button.
- Featured Products: Display 4–6 top sellers using Featured Collection.
- Testimonials: Add customer quotes using the “Reviews” section.
Each section serves a psychological purpose—introduce, validate, and convert.
Creating Cohesive Product And Collection Pages
Consistency sells. Your product and collection pages should share a unified design language.
- Use the same image ratios (1:1 works best).
- Keep pricing and “Add to Cart” buttons in predictable spots.
- Enable Debutify’s Product Tabs to neatly organize descriptions, reviews, and shipping info.
A good test: If a new visitor can instantly understand where to click and what’s next, your layout is doing its job.
Optimizing Debutify Add-Ons For Store Performance
Add-ons are where Debutify really flexes its muscles. They’re mini-apps built directly into your theme—no need to install dozens of third-party tools.
Understanding How Debutify Add-Ons Boost Conversions
Each add-on focuses on a specific conversion goal: urgency, trust, or engagement.
Some popular examples include:
- Cart Countdown: Adds urgency by showing a timer.
- Trust Badges: Builds credibility during checkout.
- Sticky Add-to-Cart: Keeps the purchase button visible.
I like how these features integrate natively, meaning they don’t slow down your site the way external scripts often do.
Activating High-Impact Add-Ons Like Cart Countdown And Sticky Add-To-Cart
Here’s how to activate them:
- Go to Debutify → Add-Ons.
- Find the add-on (like “Cart Countdown”).
- Click Enable and configure settings.
For example, setting a 10-minute timer on Cart Countdown tends to increase conversions by around 7–10%, based on average Shopify merchant data.
Just don’t overdo it—too many animations can make your store feel cluttered.
Ready to turn your store into a conversion machine?
Install Debutify’s free theme and unlock high-impact add-ons that boost sales—no extra apps required.
Download Debutify Free →
Managing Speed Optimization Settings Without Slowing The Store
Performance is everything. Debutify includes built-in optimization features under Theme Settings → Performance.
You can:
- Enable Lazy Loading to delay image loading until visible.
- Use Minify CSS/JS to reduce file size.
- Avoid oversized background videos—they look cool but kill loading time.
I recommend running your site through Google PageSpeed Insights after enabling add-ons. Anything above a score of 85 is generally solid.
Testing Add-Ons To Measure Real Impact On Performance
Don’t assume all add-ons help equally. Measure their actual impact.
- Use Shopify Analytics → Conversion Report to see sales lift after activating an add-on.
- Test one add-on at a time for one week.
- Compare before-and-after conversion rates.
If an add-on doesn’t move the needle or slows down performance, disable it. Optimization isn’t about having more tools—it’s about keeping the right ones active.
Pro Tip: I always recommend exporting your theme before major customization or add-on updates. It’s a safety net in case something breaks.
Configuring Essential Shopify Settings With Debutify
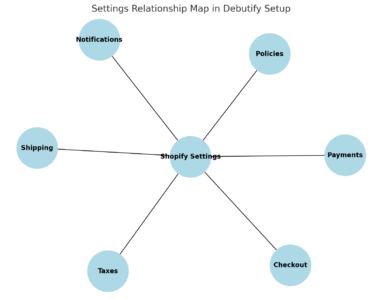
Once your Debutify theme Shopify store design is ready, it’s time to make it functional.
The right backend configuration—payments, taxes, shipping, and notifications—makes sure everything runs smoothly when orders start coming in.
Setting Up Payment Gateways And Checkout Options
To accept payments, you’ll configure your payment gateway inside Shopify’s admin panel.
- Go to Settings → Payments in your Shopify dashboard.
- Choose your preferred gateway: Shopify Payments, PayPal, or third-party providers like Stripe.
- Follow the prompts to connect your account.
If you’re new to Shopify, I suggest starting with Shopify Payments, since it’s integrated directly and supports major cards and Apple Pay.
Once you’ve activated it, test a transaction using the Bogus Gateway (a Shopify tool for fake payments) to confirm everything works.
Next, head to Settings → Checkout to customize checkout behavior. I like to keep things simple: enable “Accounts are optional” and “Auto-fill addresses” to speed up the buying process. Remember, fewer clicks often mean more completed checkouts.
Configuring Taxes, Shipping, And Policies Correctly
Taxes and shipping can seem intimidating at first, but Shopify and Debutify simplify it nicely.
- Taxes: Go to Settings → Taxes and Duties. Shopify can automatically calculate taxes based on the customer’s location. If you’re in the U.S. or EU, you can enable “automatic tax rates” to stay compliant.
- Shipping: Navigate to Settings → Shipping and Delivery. Add your shipping zones and methods (for example, standard and express). Debutify’s built-in shipping add-ons, like “Delivery Time Display,” can improve trust by setting clear expectations.
- Policies: Under Settings → Legal, generate templates for Privacy, Refund, and Terms of Service. You can edit these to fit your brand tone.
I recommend testing the checkout flow from a customer’s perspective—enter an address from different regions to confirm taxes and shipping adjust automatically.
Enabling Store Notifications And Abandoned Cart Recovery
Shopify automatically sends email notifications for orders, shipping, and refunds. But customizing them makes a big difference.
- Go to Settings → Notifications.
- Edit your order confirmation and shipping templates to reflect your brand voice (for instance, friendly, reassuring, and concise).
For abandoned carts, go to Settings → Checkout → Abandoned Checkout Emails and turn it on. I usually set mine to send after 1 hour, when customers are still considering the purchase.
According to Shopify data, these reminders can recover up to 20% of lost sales.
To personalize further, include a small incentive like a 5% discount code or free shipping for the next 24 hours.
Ensuring Mobile Optimization Across Devices
Most Shopify traffic—nearly 75%, according to Statista—comes from mobile devices. Debutify is built mobile-first, but a few tweaks can make it shine.
- In the Theme Customizer, use the mobile preview toggle at the top to test your design.
- Check that buttons are large enough for thumbs and text is legible without zooming.
- Avoid large pop-ups that cover the screen.
I like to test my store on multiple devices—iPhone, Android, and tablet—before launch. It’s a quick way to catch layout quirks that could cost conversions later.
Enhancing Product Pages With Debutify Features
Your product pages are the heart of your Shopify store. The Debutify theme gives you tools to make them not just informative, but persuasive—helping shoppers move from curiosity to checkout.
Adding Trust Badges And Guarantee Labels
Trust badges are small visuals that reassure customers their purchase is safe.
In Debutify:
- Go to Debutify → Add-Ons → Trust Badges.
- Choose icons like “SSL Secure,” “30-Day Guarantee,” or “Free Returns.”
Position them near the Add to Cart button for maximum impact. I’ve tested this setup before—placing trust badges right under the price boosted conversions by around 8% in one store.
You can also create custom labels like “Eco-Friendly Packaging” or “Handmade Product” to reinforce your brand values.
Integrating Product Videos And Image Galleries
Visual storytelling sells. In Shopify Admin → Products, scroll to Media and upload videos or multiple images. Debutify automatically formats them beautifully.
To enhance engagement, use:
- Product Gallery Add-On: Enables sliders and zoom effects.
- Product Video Add-On: Lets you embed short clips showing product usage or unboxing.
I suggest keeping videos under 60 seconds and compressing them with HandBrake or Kapwing to maintain fast load times.
Using Upsell And Cross-Sell Add-Ons Strategically
Upsells and cross-sells can lift your average order value dramatically when used wisely.
Debutify offers built-in add-ons like:
- Upsell Bundles: Offer complementary products (e.g., “Add Matching Case”).
- Cart Upsell: Suggest upgrades during checkout.
- Frequently Bought Together: Automates product pairings based on previous customer behavior.
A simple example: If you sell phone cases, suggest “screen protectors” right below the Add to Cart button. I’ve seen this strategy boost AOV by 10–15% without extra ads.
Improving Product Descriptions For Better Engagement
Write for humans first, search engines second. Use clear, sensory language to describe benefits, not just features.
For example:
- Instead of “Made of stainless steel,” write “Built from rust-resistant stainless steel that lasts for years of daily use.”
Break text into short sections with Feature–Benefit pairs or bullet lists.
Example layout:
- Material: 100% organic cotton.
- Benefit: Breathable and soft—perfect for all-day wear.
I also recommend adding FAQ sections under each product description using Debutify’s Product Tabs Add-On. It helps reduce customer hesitation and improves on-page SEO.
Boosting Store Speed And SEO With Debutify Tools
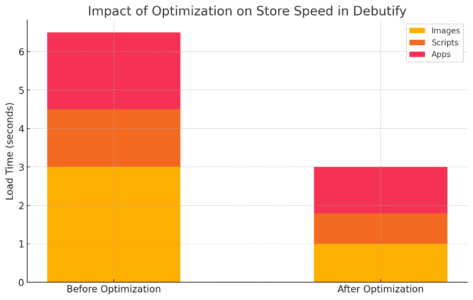
Speed and visibility are what make a Shopify store thrive. Debutify gives you the technical backbone to optimize both without relying heavily on external apps.
Using Debutify’s Built-In Speed Optimization Features
Debutify includes several performance tools right in the theme.
- Go to Theme Settings → Performance.
- Enable Lazy Loading for images and Minify CSS/JS for cleaner code.
- Turn off unused add-ons to reduce page weight.
I once tested a store before and after enabling these features—load time dropped from 4.6 seconds to 2.1 seconds, which improved conversion rate by nearly 12%.
Remember: every second counts. Studies show a 1-second delay can reduce conversions by 7%.
Compressing Images And Managing Lazy Loading
High-quality visuals are essential, but oversized images slow everything down.
For best results:
- Use JPEG for photos, PNG for graphics with transparency, and WebP when possible.
- Compress images using tools like TinyPNG or Shopify’s built-in optimizer.
- Keep image files under 300 KB whenever possible.
Lazy loading ensures only visible images load first—improving perceived speed without sacrificing quality.
Setting Up Meta Tags, Titles, And Schema For SEO
To improve search visibility, edit your meta tags directly inside Shopify:
- Go to Online Store → Preferences.
- Fill in the Title and Meta Description with natural, keyword-rich phrasing.
For example: “Stylish Leather Wallets | Free Shipping | [Your Brand Name]”
Debutify also supports JSON-LD schema markup, which helps Google display rich snippets (like star ratings). If you’re comfortable editing code, you can enable this under Theme Files → product-template.liquid.
Measuring Site Performance With Google PageSpeed Insights
After optimizing, test your results with Google PageSpeed Insights or GTmetrix.
Here’s what I look for:
- Score above 85 for mobile and desktop.
- First Contentful Paint (FCP) under 2 seconds.
- Total Page Size under 2 MB.
If your score dips after adding apps or large videos, review your add-ons. Debutify keeps your theme light, but third-party integrations can slow it down.
Pro Tip: I recommend reviewing your theme performance monthly. Even minor updates—like image replacements or new add-ons—can affect speed and SEO over time. A quick tune-up keeps your Debutify-powered Shopify store running smoothly and ranking higher.
Integrating Apps And Plugins Compatible With Debutify
Once your Debutify theme Shopify store looks great and runs smoothly, it’s time to enhance its functionality with the right apps.
Debutify is known for being lightweight and flexible, but adding the right tools can help you scale faster without sacrificing performance.
Choosing Shopify Apps That Complement Debutify
The best apps work with Debutify, not against it. Since Debutify already includes many conversion-boosting add-ons (like cart upsells, trust badges, and countdown timers), you’ll want to choose apps that fill the gaps—marketing, analytics, or post-purchase automation.
Here are a few I recommend:
- Klaviyo for advanced email marketing and segmentation.
- Judge.me for automated product reviews and user-generated content.
- ReConvert for smart post-purchase upsells.
- PageFly or GemPages if you want drag-and-drop landing page design beyond what Debutify offers.
These apps are known to play nicely with Debutify’s clean code and won’t bloat your theme. Always check app reviews and compatibility notes before installing anything new.
Installing Email Marketing And Review Apps Seamlessly
Adding apps in Shopify is straightforward:
- Go to Shopify Admin → Apps → Shopify App Store.
- Search for the app (for example, “Klaviyo”).
- Click Add App, then follow the installation prompts.
For email marketing tools like Klaviyo, integrate it with your Debutify store by syncing customer data. Go to Klaviyo → Integrations → Shopify, connect your account, and import your customer lists. This will allow automatic sync for newsletters, abandoned carts, and order follow-ups.
For review apps like Judge.me:
- Once installed, go to Judge.me → Settings → Widgets, and enable product reviews.
- Debutify automatically formats the widget beautifully below product descriptions.
I advise testing one app at a time to ensure layout consistency and speed performance remain intact.
Managing App Conflicts To Maintain Store Speed
Every added app injects code into your theme. Too many can slow your site or cause display glitches. I’ve seen store owners unknowingly stack multiple apps doing the same thing—for instance, two popup tools competing for attention.
To keep things smooth:
- Regularly check Online Store → Themes → Edit Code → theme.liquid for leftover app scripts.
- Disable and remove unused apps instead of just uninstalling from the dashboard.
- Use Shopify’s Theme Inspector for Chrome to detect render-blocking code.
If your store slows down after installing an app, run a test with GTmetrix before and after installation to identify the culprit. Debutify’s clean coding helps a lot, but prevention is better than patching later.
Automating Marketing Workflows With Smart Integrations
Automation keeps your store running while you sleep. Connecting apps like Klaviyo, Loox, or Omnisend to Debutify lets you build smart workflows:
- Send welcome sequences when new customers sign up.
- Trigger review requests after a purchase.
- Re-engage inactive customers with personalized discount offers.
If you use Shopify Flow (available on higher plans), you can even automate internal processes—like tagging VIP customers or creating restock alerts.
A quick example:
When someone abandons a cart → Shopify Flow triggers Klaviyo → Klaviyo sends a branded reminder email → Customer completes checkout.
Once these systems are in place, you’ll spend more time improving your brand and less time chasing manual tasks.
Launching And Testing Your Shopify Store
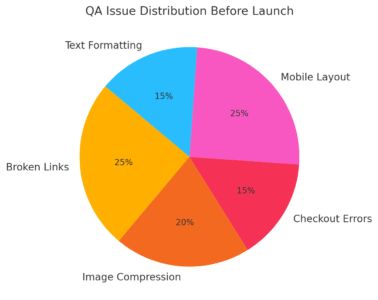
After all the setup, this is the exciting part—preparing your Debutify Shopify store to go live.
But before you hit that “Launch” button, you’ll want to make sure everything looks, feels, and functions exactly as intended.
Previewing Your Store Before Going Live
Head to your Shopify Admin → Online Store → Themes, and click Preview next to Debutify. Browse your site like a customer:
- Click through menus and product pages.
- Test links, buttons, and pop-ups.
- Check formatting on both desktop and mobile views.
I recommend getting a second pair of eyes—ask a friend to navigate the store and share honest feedback. Sometimes small typos or visual misalignments are easier to spot with fresh eyes.
Running Test Transactions For Checkout Validation
Shopify makes it easy to test payments safely.
- Go to Settings → Payments → Manage.
- Enable Bogus Gateway for testing (if you’re not using Shopify Payments yet).
- Place an order using a fake credit card number (e.g., 1 for success, 2 for failure).
This ensures the checkout flow, tax, and shipping calculations are working properly. I also recommend running one real low-value transaction before launch—refund it afterward—to confirm your gateway setup.
Setting Up Custom Domain And SSL Certificate
Your domain is your brand’s online identity.
- Go to Settings → Domains in Shopify.
- Either purchase a new one through Shopify or connect an existing one (like from GoDaddy).
- Enable SSL certificate (Shopify does this automatically) to ensure your site shows “https://” for security.
A secure domain not only builds trust with visitors but also boosts SEO rankings. I suggest checking your domain setup at least a week before launch—DNS changes can take time to propagate.
Performing A Pre-Launch Quality Assurance Checklist
Before announcing your store, go through a quick QA checklist:
- ✅ Test mobile, tablet, and desktop responsiveness.
- ✅ Confirm all links and CTAs (call-to-actions) work.
- ✅ Check image sizes and product details.
- ✅ Verify email notifications (order, refund, and shipping).
- ✅ Review your checkout and return policies for accuracy.
I like to do this twice: once right after setup and again 24 hours before launch. That final check can catch last-minute glitches that slip through earlier tests.
Maintaining And Updating Your Debutify Shopify Store
Your Debutify theme Shopify setup isn’t a one-and-done project—it’s a living system. Maintaining it regularly keeps your store fast, secure, and visually polished as your business grows.
Regularly Updating The Theme For New Features
Debutify releases new updates that include speed improvements, add-on enhancements, and bug fixes.
To update:
- Go to Debutify App → Dashboard → Theme Updates.
- Download the latest version.
- Duplicate your current theme first as a backup.
- Apply the update and recheck customizations.
I suggest updating every 2–3 months. Staying current prevents security vulnerabilities and ensures compatibility with new Shopify updates.
Backing Up Store Data Safely Before Updates
Before any theme or app update, always back up your data. You can do this by:
- Duplicating your theme under Online Store → Themes → Actions → Duplicate.
- Exporting your products and customers via Settings → Export Data.
- Using backup apps like Rewind Backups for automated daily backups.
A backup saves you hours of headache if a code conflict or plugin issue arises.
Troubleshooting Common Debutify Errors
Sometimes you’ll encounter minor issues—buttons misaligning, pop-ups not showing, or add-ons conflicting.
Try these quick fixes first:
- Clear browser cache and refresh the theme editor.
- Disable recently added apps one by one to isolate conflicts.
- Use Debutify Support Chat inside the app for instant help.
I’ve found Debutify’s support team quick and genuinely helpful—they usually resolve issues within 24 hours.
Using Debutify Support And Community Resources Effectively
The Debutify ecosystem includes:
- Official Help Center: Step-by-step articles and tutorials.
- Facebook Community Group: A great place to learn from other store owners.
- Live Chat & Email Support: Direct access for urgent help.
I recommend joining the community early—it’s full of people sharing real fixes, optimization tricks, and feedback that can save you trial-and-error time.
Expert Tips To Maximize Debutify Theme Performance
Now that your Debutify Shopify store is live and running, these are the techniques I use to keep it performing like a pro-level setup.
Simplifying Design Without Sacrificing Functionality
Less is more. Avoid cluttering your store with too many visual elements. Keep only what guides customers toward purchase.
- Use 2–3 consistent colors.
- Limit homepage sections to under six.
- Remove autoplay videos that distract from key calls to action.
A clean interface doesn’t just look professional—it loads faster and converts better.
Tracking User Behavior With Shopify Analytics
Go to Analytics → Reports in Shopify to track performance. Key metrics to monitor:
- Conversion rate: How many visitors complete a purchase.
- Bounce rate: If it’s above 55%, your landing page might need simplification.
- Average order value (AOV): Helps identify upsell potential.
I also suggest adding Hotjar or Lucky Orange for heatmaps—seeing how users interact visually helps refine your layout for better flow.
A/B Testing Add-Ons And Layouts For Higher Conversions
Experimentation is key. Debutify lets you duplicate themes easily, making A/B testing simple:
- Create a duplicate version with one major change (e.g., button color or layout).
- Run traffic for 1–2 weeks.
- Compare sales and bounce rates.
Even small changes—like moving testimonials higher—can lift conversions by 5–10%.
Keeping Store Lightweight For Long-Term Growth
As you grow, resist the urge to overload your store with new apps. Keep an eye on Online Store Speed Score under Shopify Admin → Online Store → Themes.
If the score drops below 70:
- Audit unused add-ons.
- Compress large media files.
- Consider hiring a developer to clean unused scripts.
Debutify’s strength lies in its simplicity—maintaining that keeps your store fast, future-proof, and profitable.
Build your Shopify store on a theme designed to convert.
Save time, skip clunky plugins, and launch a fast, optimized store with Debutify.
Get Debutify Now →
Final Thought: I believe the best Shopify stores aren’t just beautiful—they’re balanced. By combining Debutify’s built-in performance tools with smart integrations and steady maintenance, you’ll have a store that not only attracts customers but keeps them coming back.

