Table of Contents
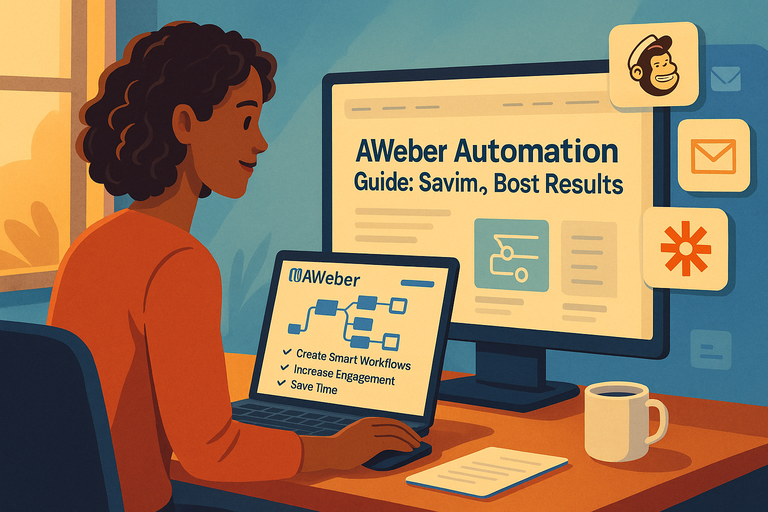
Aweber automation can completely change how you manage email marketing—turning repetitive tasks into effortless workflows that run on autopilot.
Imagine sending perfectly timed emails, tracking subscriber actions, and boosting engagement while saving hours each week. Sounds good, right?
But how exactly can Aweber automation help you achieve all that—and which features should you use to get the best results? That’s exactly what this guide will uncover, step by step.
Understanding The Power Of Aweber Automation
Aweber automation is more than just a time-saver—it’s like having a digital marketing assistant that works 24/7, sending the right message to the right person at the right moment.
Once you understand its potential, you start to see how it transforms your email marketing from manual effort into a smooth, strategic system.
How Aweber Automation Simplifies Your Email Marketing
If you’ve ever felt overwhelmed managing follow-ups, promotions, and newsletters, Aweber automation takes that chaos and turns it into calm.
Instead of manually sending every email, you can use Aweber Campaigns—their automation engine—to build workflows that run automatically.
Here’s a simple example:
- Go to Messages → Campaigns → Create a Campaign.
- Choose “Blank Campaign” or use a prebuilt one like “Welcome Series.”
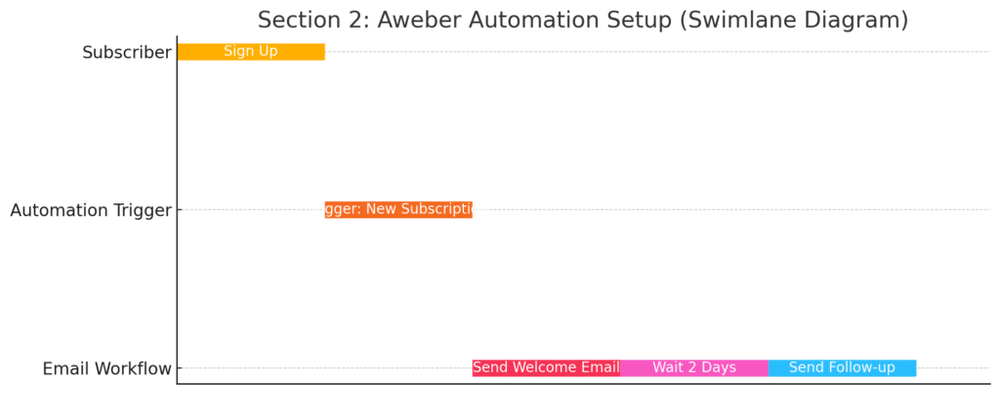
- Set a trigger—for example, when someone subscribes to your list.
- Add emails, set delays (like “wait 2 days”), and you’re done.
What I like most about Aweber is how visual it feels. You can drag, drop, and reorder messages easily. It’s not “set and forget,” but “set and scale.” Once a workflow runs, you can adjust timing, subject lines, or message content anytime without rebuilding it from scratch.
Why Automated Workflows Improve Engagement Rates
People respond best when messages feel timely and personal. Automation makes that possible.
Instead of sending a single broadcast email to everyone, Aweber workflows adapt to your subscriber’s behavior—clicks, opens, purchases, or even lack of activity.
For example:
- If a subscriber clicks a link about “email templates,” you can automatically tag them “Interested in Templates.”
- That tag can trigger a new workflow showing more examples or offering a free template download.
It’s personalization at scale. I’ve seen engagement rates increase by 30–50% when automations were fine-tuned this way. The magic lies in relevance—each subscriber receives what actually interests them, not what you hope might.
The Key Benefits Of Using Aweber For Automation
The biggest advantage is consistency. Aweber automation ensures no lead gets forgotten and no opportunity slips through the cracks.
Some standout benefits include:
- Time efficiency: Set once, run endlessly with small tweaks.
- Better conversions: Targeted messages nurture trust and action.
- Improved segmentation: Use tags and behavior triggers to build smart lists.
- Higher engagement: Subscribers receive messages aligned with their actions.
Aweber also integrates easily with tools like Shopify, WordPress, and Zapier, allowing you to trigger automations when someone buys, signs up, or downloads something. Once you’ve experienced that level of control, going back to manual emailing feels prehistoric.
Setting Up Your First Aweber Automation Workflow
Creating your first Aweber automation is surprisingly simple, but doing it right requires a bit of planning. The idea is to start small—build one workflow that delivers real value—then expand from there.
Step-By-Step Process To Create Your First Automation
Here’s how to set up your first automated workflow in Aweber:
- Go to: Messages → Campaigns → Create a Campaign.
- Choose your trigger: For most users, “On Subscribe” works best for a welcome series.
- Add your messages: Write each email (Aweber’s drag-and-drop editor is intuitive).
- Set delays: For example, wait one day between the welcome email and the follow-up.
- Activate tags: Add or remove tags automatically based on user behavior.
Pro tip: Before launching, test your campaign by subscribing to your own list with a test email. It’s a quick way to spot any broken links or timing issues.
Ready to launch your first workflow without second-guessing the steps?
Try Aweber’s Free Campaign Builder and start automating your welcome series today.
How To Choose The Right Triggers For Your Audience
Triggers decide when your automation starts. Aweber offers simple but powerful options—like “when a subscriber joins your list,” “opens an email,” or “clicks a link.”
To make them work effectively:
- Match the trigger to intent. Use “subscribe” for a welcome series, or “click” for interest-based campaigns.
- Avoid over-triggering. Too many overlapping automations can confuse subscribers.
- Use tags wisely. Tags let you move subscribers between workflows seamlessly.
Here’s a real example: if someone downloads your “Email Strategy Guide,” tag them as “Interested in Email Strategy.” Then, trigger a three-part educational series that builds on that interest. You’re guiding, not guessing.
Best Practices For Organizing And Naming Your Automations
Once you have multiple workflows, things can get messy fast. I recommend naming each campaign clearly and using a consistent system.
Try this:
- Prefix by purpose: “Welcome_Sequence,” “Promo_BlackFriday,” “Reengagement_60Days.”
- Include version or date: So you know which one’s current.
- Add notes in descriptions: Aweber allows you to jot reminders for future updates.
This small habit saves huge headaches later—especially when you start testing variations or seasonal campaigns. Organization is invisible productivity.
Designing Smart Subscriber Journeys In Aweber
The real magic of Aweber automation appears when you start designing journeys that feel personal. Every subscriber should feel like you wrote just for them—even though you didn’t.
Mapping Out Automated Email Sequences That Convert
Before you start building, map your sequence on paper (or use a tool like Miro or Notion). Ask: “What should happen first, next, and finally?”
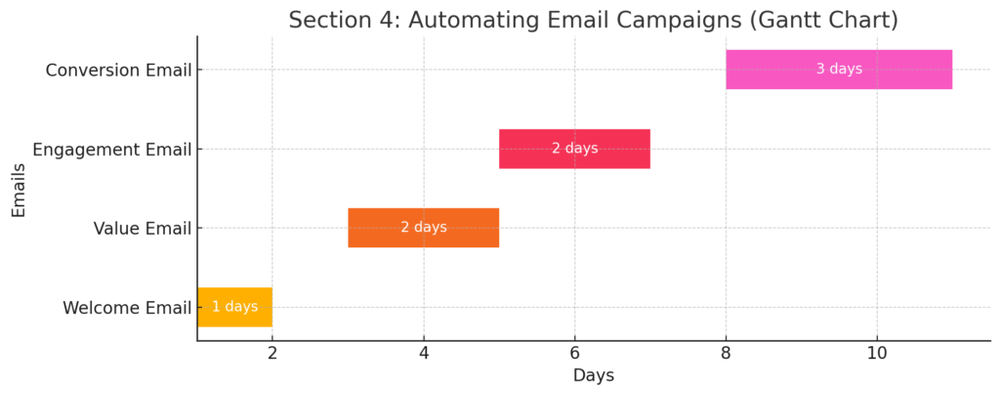
A common structure looks like this:
- Welcome email: Deliver what you promised and set expectations.
- Value email: Teach or inspire with something genuinely useful.
- Engagement email: Ask a question or invite them to reply.
- Conversion email: Present your offer or next step.
In Aweber, you can easily drag these into place and set time gaps. I recommend 1–2 days between early emails, then longer gaps as trust builds. It’s like pacing a conversation—don’t rush the relationship.
Personalizing Your Messages Based On User Behavior
Aweber’s tagging system makes personalization practical. You can add tags when someone clicks a link, opens an email, or subscribes through a specific form.
Example:
- Clicked “Pricing Page” → Add tag “Interested in Upgrade.”
- Did not open last 3 emails → Add tag “Inactive.”
Then use conditional logic to send unique messages. For instance, “If subscriber has tag ‘Interested in Upgrade,’ send offer email.” It feels tailor-made—and that’s exactly what keeps readers engaged.
Using Tags And Segments To Send More Relevant Emails
Tags are your best friend in Aweber automation. Think of them as labels that describe what someone did or wants. Segments are groups built from those tags.
Here’s how I use them:
- Tag actions: Add a tag every time someone downloads, clicks, or buys.
- Segment lists: Create a segment like “Clicked Link in Email #2” or “Bought Product A.”
- Target smarter: Send different automations based on these segments.
For instance, if you sell online courses, tag users by topic—“Email Marketing,” “Copywriting,” “SEO.” Then create automations that speak directly to each interest.
When you segment this way, your unsubscribe rate drops and your click rate climbs—because people finally get messages they want to read.
Automating Email Campaigns For Maximum Results
Once you’ve set up your first Aweber automation, the next step is fine-tuning your email campaigns for real impact.
This is where automation goes beyond convenience—it becomes a strategy that consistently grows engagement and sales.
How To Schedule Drip Campaigns Without Overwhelming Subscribers
A drip campaign is simply a timed sequence of emails sent automatically to nurture your subscribers. In Aweber, you can build these using Campaigns and the “Wait” action, which lets you control the delay between messages.
To do it:
- Go to Messages → Campaigns → Create a Campaign.
- Select a trigger (for example, “On Subscribe”).
- Add your email series using the drag-and-drop editor.
- Between each message, drag in a Wait action like “Wait 2 days.”
- Activate the campaign when ready.
The key is pacing. I suggest starting with one email every two to three days, then extending to weekly once your relationship builds. Bombarding subscribers early is a fast route to unsubscribes.
A practical trick I’ve used: check your analytics after the first few days. If open rates drop by more than 20% after the second email, your timing is too aggressive. Slow the sequence and observe the difference.
Remember—email automation is not about volume, it’s about rhythm. Give people time to breathe between messages, and they’ll stay with you longer.
Tips For Writing Automated Emails That Feel Personal
It’s easy for automation to feel robotic—but it doesn’t have to. Aweber’s personalization tools make it possible to sound human, even when the system handles delivery.
Here’s how to do it naturally:
- Use personalization fields. Add “Hi {First Name},” to your emails by clicking “Personalize” in the editor.
- Write conversationally. Think of one person when you write—avoid corporate tone.
- Reference timing. Phrases like “I wanted to check in after your download last week” make the message feel timely.
- Add real value. Each automated email should teach, remind, or reward.
I often recommend writing the first email as if you were explaining something to a friend who just asked about your service. That tone of honest helpfulness is what builds connection—even through automation.
Using Dynamic Content To Keep Campaigns Fresh And Engaging
Dynamic content in Aweber lets you change parts of your email based on tags, segments, or subscriber data. It’s like sending multiple tailored versions of the same email—all from one message.
Here’s a quick example: You can show different product recommendations using the conditional content block.
- If the subscriber has the tag “Beginner,” display intro-level resources.
- If they have “Advanced,” show case studies or premium offers.
This not only increases engagement but also shortens your workload—you’re customizing at scale.
I suggest starting with small personalization tweaks, like dynamic intros or product sections, before fully customizing entire messages.
A/B testing proves it’s worth it. In one campaign, swapping static text for dynamic content improved click-through rates by 42%. It’s small details like that that make automation feel alive rather than mechanical.
Advanced Aweber Automation Features You Should Try
Once you’ve nailed the basics, Aweber offers more advanced tools that can elevate your automation strategy. These features are often underused—but they’re where the real power lies.
Leveraging Conditional Logic For Smarter Campaigns
Conditional logic in Aweber allows you to create “if this, then that” style workflows. It reacts to your subscriber’s behavior—so your emails evolve as they do.
Example path:
- If a subscriber opens your welcome email, send them your follow-up resource.
- If they don’t open it after 3 days, resend it with a new subject line.
In the Campaigns builder, you can add conditions like “Tag Applied” or “Opened Email” to shape how subscribers move through your sequence.
I believe conditional logic is the secret to sending fewer emails while achieving more conversions. It ensures every message has context—and that’s something your audience feels, even subconsciously.
Integrating Aweber With Other Tools To Extend Automation
The beauty of Aweber automation is how easily it connects with other platforms. You can use integrations to extend automation far beyond your email list.
Some useful connections include:
- Shopify: Automatically tag buyers based on what they purchase.
- WordPress: Add new sign-ups directly from blog forms to a campaign.
- Zapier: Link Aweber with tools like Google Sheets, Slack, or Typeform to automate data flow.
Here’s a real-world example I’ve set up before: When someone fills out a Typeform survey, Zapier adds them to a specific Aweber list and triggers a tailored follow-up campaign. It saves hours of manual work and ensures fast, relevant responses.
When you integrate your marketing ecosystem this way, you turn Aweber into the central command of your communication strategy—everything else just syncs around it.
Setting Up Re-engagement Campaigns For Inactive Subscribers
Inactive subscribers are silent opportunities waiting to be reawakened. Aweber makes it simple to identify and re-engage them through automation.
Here’s how I typically set it up:
- Create a segment of people who haven’t opened your emails in 60 or 90 days.
- Tag them as “Inactive.”
- Trigger a re-engagement campaign using that tag.
In your message, be transparent—something like:
“Hey, I noticed you haven’t been opening my emails lately. Do you still want to stay in touch?”
Then give them two clear options: stay or unsubscribe. You’ll clean your list, improve deliverability, and possibly re-spark interest with people who were just waiting for a reason to come back.
Industry data backs this up—well-crafted re-engagement campaigns can recover up to 15–20% of inactive subscribers. That’s not just a number; it’s a potential 20% boost in active audience without spending a cent on new leads.
Tracking Performance And Optimizing Your Automation
Building automations is only half the job—improving them over time is where the results compound.
Aweber gives you clear insights to measure performance, identify gaps, and refine your workflows.
How To Measure The Success Of Your Aweber Automations
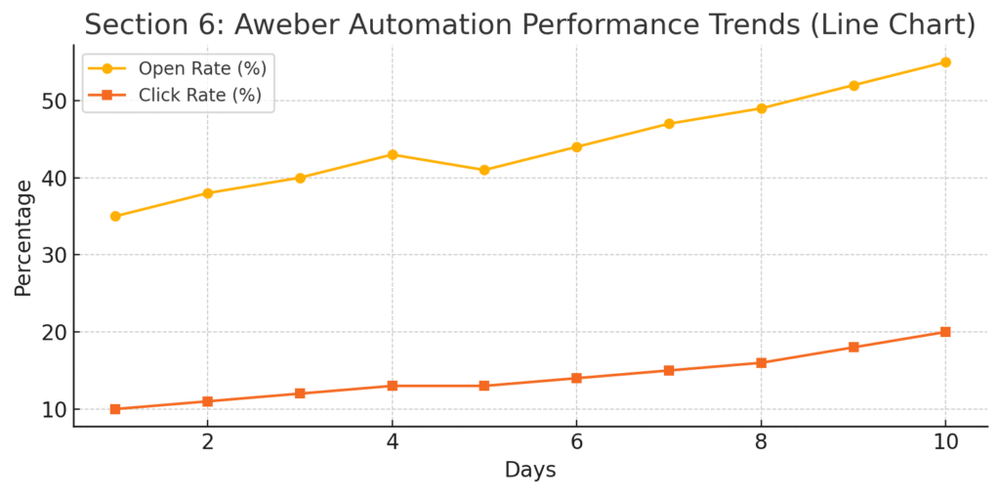
In Aweber’s Reports section, you can track open rates, click-through rates, and unsubscribes for each campaign. But don’t just look at averages—watch trends.
For instance:
- Are opens consistent throughout your series, or do they drop after email #2?
- Which links get clicked most often?
- Do certain days or times yield better engagement?
I usually export campaign data monthly and review performance side-by-side. Even a 5% improvement per month adds up significantly over a year. That’s the mindset of optimization—steady, incremental progress.
Key Metrics To Watch For Continuous Improvement
Here are the core metrics I always keep an eye on:
- Open rate: Measures how effective your subject lines are. Aim for 25–40%.
- Click-through rate (CTR): Tracks how compelling your email content and calls-to-action are.
- Conversion rate: If linked to sales or sign-ups, this shows the real ROI of your automation.
- Unsubscribe rate: Over 0.5% per email suggests content fatigue or poor targeting.
One trick I recommend is tagging emails by theme (e.g., “educational,” “promotional,” “personal story”). Then, check which category consistently performs best. That insight helps you double down on what works.
Refining Your Workflow Based On Data And Insights
The best automations evolve. After reviewing performance, make small, data-backed tweaks. For instance:
- Change the timing between emails based on open trends.
- Reorder emails if engagement dips mid-series.
- Test alternate subject lines using A/B tests.
Aweber’s editor makes it simple to duplicate and modify campaigns without starting over. I like to create a “V2” of a workflow every few months, compare it to the previous version, and see which performs better.
Here’s the real secret: treat automation like a living experiment, not a finished project. Every metric tells a story—your job is to listen and respond.
Over time, those adjustments compound into something that runs efficiently, scales beautifully, and feels completely effortless.
Common Aweber Automation Mistakes To Avoid
Even the best tools lose their power when used carelessly—and Aweber automation is no exception. I’ve seen marketers build beautiful campaigns that fall flat simply because of a few avoidable errors.
Let’s walk through the most common ones and how to fix them before they cost you results.
Over-Automating And Losing The Human Touch
Automation is meant to enhance relationships, not replace them. I’ve noticed some users try to automate every single interaction—welcome emails, support messages, upsells—all without any real human input. The problem? It starts feeling robotic fast.
Here’s how to prevent that:
- Mix automation with authenticity. Add occasional personal check-ins or live broadcasts.
- Use natural language. Avoid canned lines like “We value your business.” Instead, write like you’d speak.
- Keep it contextual. Mention recent events, product updates, or customer wins to make your messages feel fresh.
Aweber gives you plenty of room for warmth. You can insert personal notes, reference recent activity (like a webinar they joined), or even use dynamic content to show gratitude. Remember, subscribers signed up to hear from you, not your robot.
Ignoring Testing And Quality Checks
This one’s surprisingly common—and dangerous. You set up an automation, write your emails, hit “Activate,” and assume it’s perfect. Then a subscriber writes, “Hey, your link’s broken.”
Before launching any Aweber automation, I always run a quality checklist:
- Send a test email to yourself. Check spacing, formatting, and links.
- Preview for mobile. Aweber’s preview tool lets you see how emails appear on phones.
- Verify triggers. Make sure the correct tags or lists start the campaign.
Aweber’s “Test Campaign” option is your friend here—it lets you simulate subscriber actions before going live. I believe testing is what separates casual senders from real marketers. It’s the digital version of proofreading your first impression.
Failing To Segment Properly Or Target The Right Audience
Segmentation is the heart of successful automation. Without it, your emails are like throwing darts blindfolded—some might hit, but most will miss.
In Aweber, segmentation revolves around tags and custom fields. These let you group people based on behavior, location, or interests. Here’s how to make it work:
- Tag subscribers based on link clicks, purchases, or sign-up forms.
- Create segments like “Clicked Product Demo” or “Didn’t Open in 30 Days.”
- Send messages that match their specific journey.
For instance, if you run a fitness brand, sending “Beginner Workout Tips” to seasoned athletes just creates friction.
I advise checking your segments monthly to ensure your automations still align with subscriber data.
Expert Tips To Save More Time With Aweber Automation
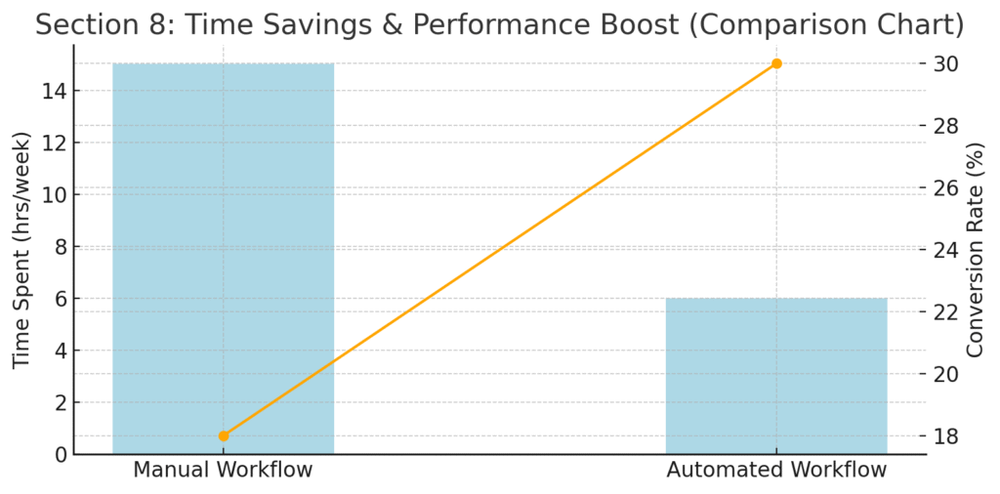
Once your workflows are running smoothly, it’s time to make them more efficient. Aweber offers a range of shortcuts that can help you automate smarter, not harder.
Using Templates And Pre-Built Campaigns Efficiently
Aweber’s pre-built campaigns are a gift for busy marketers. You’ll find templates like “Welcome Series,” “Lead Nurture,” and “Blog Newsletter.” These come preloaded with structure—you just tweak the text and timing.
To use them:
- Go to Messages → Campaigns → Create a Campaign.
- Choose from the Pre-Built Templates list.
- Customize the messages, timing, and triggers.
I recommend saving your own best-performing campaigns as templates too. Just click “Save as Template” after building one. This turns your previous success into a repeatable system, saving hours for future launches.
Templates aren’t lazy shortcuts—they’re efficiency in disguise. The trick is to personalize them enough that they feel fresh, not factory-made.
Automating Your Newsletter Creation Process
If you publish content regularly, Aweber can automate your newsletter creation with Blog Broadcasts (RSS-to-Email). This feature pulls your new blog posts and automatically sends them to subscribers.
Here’s a quick setup path:
- Go to Messages → Blog Broadcasts → Create a Broadcast.
- Enter your blog’s RSS feed URL (something like yourdomain.com/feed).
- Choose a template and frequency—daily, weekly, or monthly.
I use this feature to send “content roundups” automatically every Friday. It keeps your audience updated without writing the same summaries repeatedly. You still control the design, but the content pulls itself.
Automation doesn’t mean you disappear—it means your content keeps moving even when you’re focused elsewhere.
Streamlining Follow-Up Sequences To Increase ROI
Follow-ups are where most conversions happen, but writing and scheduling them manually is exhausting. With Aweber, you can chain follow-ups based on engagement.
For example:
- If someone opens your first email but doesn’t click → send a value-driven reminder.
- If they click → tag them and trigger your sales sequence.
To build this, just add Tag Automation Rules within each message. I recommend setting one clear goal per follow-up sequence—educate, convert, or re-engage. When every email has purpose, your ROI follows naturally.
Aweber’s data shows that automated follow-ups can improve conversion rates by up to 50%. In my experience, that’s true—because consistency always beats spontaneity.
Real Ways To Boost Results With Aweber Automation
Once your systems are in place, you can focus on amplification—making every automation work harder for you.
This stage is about alignment, timing, and strategic blending of automation with authentic communication.
Aligning Automation With Your Sales Funnel Strategy
The most effective automations follow your funnel, not the other way around. Aweber makes this easy by letting you trigger automations at every funnel stage—awareness, interest, decision, and retention.
Here’s how it might look:
- Top of Funnel (TOFU): Welcome or freebie delivery campaigns.
- Middle of Funnel (MOFU): Educational or case-study sequences.
- Bottom of Funnel (BOFU): Sales offers or testimonials.
By mapping your automations to each stage, you guide subscribers logically toward conversion.
I usually build this with one list and multiple campaigns, connecting them via tags—so a “lead magnet” automatically flows into a “nurture” sequence, then into a “sales” one.
Automation should feel like guidance, not pressure. It’s about giving people the right nudge when they’re ready, not before.
Turn your funnel map into a real automated system.
Build Your First Funnel Inside Aweber and start nurturing leads on autopilot.
Encouraging Engagement Through Timely Follow-Ups
Engagement thrives on timing. Aweber’s analytics help you see when your audience interacts most—morning vs. evening, weekdays vs. weekends.
Once you spot patterns, use Send Windows in your campaigns to schedule emails during those high-engagement hours.
I’ve tested this with multiple lists and consistently found engagement jumps 10–20% just by adjusting timing. You can also re-engage late openers using Resend to Non-Openers in Broadcasts—a simple but powerful option under Reports → Quick Stats.
Automation isn’t only about what you send—it’s also about when.
Combining Automation With Manual Touchpoints For Better Impact
Automation handles consistency, but personal touches create loyalty. I like to blend both.
For instance:
- Automate your onboarding emails, but send a personal video message to new customers after 30 days.
- Use tags to identify “top 10% engaged users,” then send them handwritten thank-you notes or special offers manually.
You can even integrate Aweber with tools like Bonjoro (for personal video follow-ups) or Calendly (for scheduling calls).
These small human gestures make your brand memorable. Automation scales your message; your human moments build your reputation.
Final Thoughts And Pro Tip For Long-Term Success
Once you’ve mastered Aweber automation, it becomes more than a marketing tool—it’s your silent growth partner. But like any system, it needs care, updates, and experimentation to stay sharp.
How To Keep Your Aweber Automations Performing At Their Best
Treat your automations like living projects. Review them quarterly to ensure they still match your goals and audience.
Here’s a simple maintenance checklist I recommend:
- Revisit your welcome series every 3–6 months.
- Refresh old content or links to reflect current offers.
- Remove inactive subscribers to improve deliverability.
- Add new tags or triggers as your products evolve.
I once updated a three-year-old onboarding sequence and saw click rates jump 38%—proof that even small refreshes can reignite performance.
Expert Tip: Test, Learn, And Continuously Optimize For Growth
If I could leave you with one final piece of advice, it’s this: never assume your automation is “done.” Every list, product, and market changes with time.
Here’s what I do regularly:
- A/B test subject lines monthly.
- Rotate content blocks quarterly.
- Track engagement by segment to spot trends.
Over time, you’ll notice subtle shifts—new interests, new behavior patterns, new timing preferences. When you keep adapting, your automation keeps performing.
Aweber automation isn’t about perfection—it’s about progress. The goal isn’t to set it and forget it, but to set it and grow it. And when you approach it that way, you’ll find it’s one of the smartest investments you can make in your business.

