Table of Contents
If you’ve ever found yourself retyping sentences just to make them sound smoother, installing Quillbot for Chrome can be a total game changer.
This powerful Chrome extension instantly rewrites, summarizes, and refines your writing—right from your browser. But how exactly do you install Quillbot for Chrome and start using it within minutes?
Let’s break it down step by step so you can begin polishing your writing without switching tabs or wasting time.
What Is Quillbot for Chrome and Why You Need It
If you write emails, blogs, or even quick social media posts, you know how easy it is to second-guess your phrasing.
Quillbot for Chrome takes that pain away. It’s an AI-powered writing assistant that lives right inside your Chrome browser, helping you rephrase, summarize, or proofread text anywhere online — from Gmail to Google Docs to LinkedIn.
How Quillbot for Chrome Simplifies Everyday Writing
Think of Quillbot for Chrome as your quiet co-writer who sits in your browser, waiting to polish whatever you’re typing. Once you install it, you’ll notice a small Quillbot icon appear in text boxes on supported websites.
Here’s how it simplifies things:
- Instant Paraphrasing: Highlight a sentence, right-click, and choose “Paraphrase with Quillbot.” In seconds, you’ll see multiple alternative ways to say the same thing — more natural, formal, or creative, depending on your setting.
- Grammar and Tone Adjustments: Quillbot doesn’t just fix typos; it can make your tone more confident or polite — ideal for emails or job applications.
- No Tab-Switching Needed: Instead of copying text into another app, you can rewrite or summarize directly on the page.
I like to think of it as Grammarly’s laid-back cousin who doesn’t just correct you but helps you sound like yourself, only better.
Top Benefits of Using Quillbot Directly in Your Browser
Installing Quillbot for Chrome isn’t just about convenience — it’s about improving how you write everywhere you write.
Here’s what makes it worth using daily:
- Universal Access: Works in tools like Google Docs, Gmail, LinkedIn, Twitter (X), and even Notion.
- Speed: With just a right-click, you can paraphrase or check grammar instantly — no waiting for another tab to load.
- Customization: Choose modes like Standard, Fluency, or Creative depending on your writing goal.
- Real-Time Learning: The more you use it, the better you get at spotting weak phrasing before the AI even steps in.
For professionals and students alike, this extension saves precious minutes on every edit — and that adds up fast over a week of writing.
Tasks You Can Instantly Improve with Quillbot Integration
Once Quillbot for Chrome is active, you’ll start noticing where it quietly upgrades your writing life:
- Emails: Rewrite awkward phrasing to sound polished and friendly.
- Reports or Essays: Quickly simplify long, jargon-heavy sentences into clear ideas.
- Social Media Posts: Tighten up wordy posts while keeping your personality intact.
- Job Applications: Improve tone and eliminate errors in resumes or cover letters.
For example, when drafting a LinkedIn post, I often use Quillbot’s Fluency mode to ensure my message reads naturally without over-editing it myself. The difference is subtle but powerful — it sounds like me, only sharper.
Step-by-Step Guide to Installing Quillbot for Chrome
Getting Quillbot up and running on Chrome takes less than two minutes.
Here’s exactly how to do it from start to finish, with screenshots or tooltips that will make it even simpler once you’re in your browser.
Finding Quillbot in the Chrome Web Store
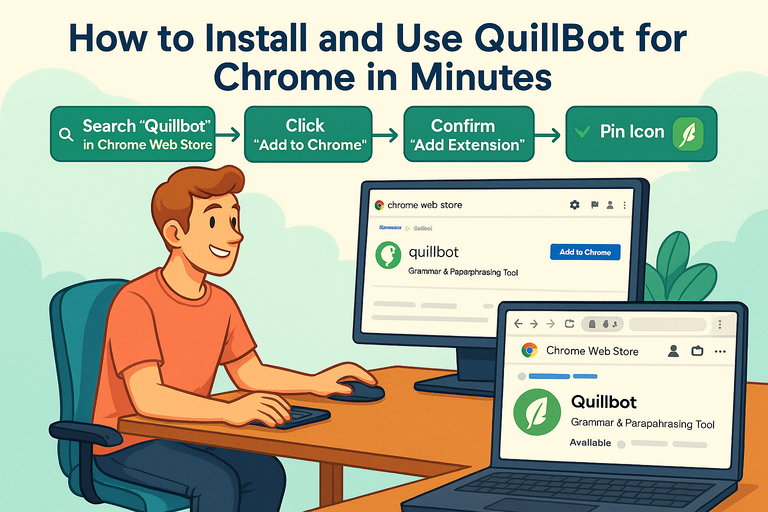
- Open your Chrome browser.
- Go to the Chrome Web Store at chrome.google.com/webstore.
- In the search bar, type “Quillbot”.
- Select the official extension called “QuillBot: AI Writing and Paraphrasing Tool.”
Quick tip: The genuine extension is published by Quillbot, Inc. — always check the publisher’s name to avoid installing a copycat version.
How to Add Quillbot Extension to Chrome
Once you’re on the official Quillbot page in the Chrome Web Store:
- Click “Add to Chrome.”
- A pop-up will appear asking you to confirm — select “Add extension.”
- Chrome will automatically download and install the extension within seconds.
After it’s installed, you’ll see a small feather-shaped Quillbot icon appear next to your address bar. That’s your AI sidekick, ready to go.
Granting Necessary Permissions for Seamless Use
To make Quillbot work inside tools like Gmail or Google Docs, it needs a few permissions. When prompted:
- Click “Allow” when Chrome asks for access to read and change text on websites you visit.
- These permissions let Quillbot detect editable text boxes and display its paraphrase or grammar options right where you type.
Don’t worry — Quillbot doesn’t store or share your text without consent. You can always manage permissions later from Chrome’s Extensions > Manage Extensions settings.
How to Pin the Quillbot Icon for Quick Access
Here’s a tiny step that makes a big difference: pinning your Quillbot icon.
- Click the puzzle-shaped Extensions icon on your Chrome toolbar.
- Find Quillbot in the dropdown list.
- Click the pin icon next to it.
Now, you’ll see the Quillbot feather icon permanently on your toolbar. This makes it easy to launch Quillbot’s sidebar or settings without digging through menus.
Pro tip: Once pinned, you can right-click the icon to open settings, check your login status, or toggle features on and off — ideal when switching between writing modes.
How to Set Up Your Quillbot Account for Chrome
Once you’ve installed Quillbot for Chrome, the next step is to connect your account so your settings, preferences, and saved work stay synced no matter where you write.
This setup only takes a few minutes but makes a world of difference in how smoothly the extension runs.
Creating or Logging Into Your Quillbot Account
When you first click the Quillbot icon on your Chrome toolbar, you’ll be prompted to sign in or create an account.
Here’s how to do it step-by-step:
- Click the Quillbot feather icon in your Chrome toolbar.
- Select “Log in” or “Sign up.”
- You can log in using your Google, Facebook, or Apple ID for one-click access, or use your email to create a password.
- Once you’re logged in, the extension will automatically link to your Quillbot web account.
I recommend logging in with Google—it syncs instantly and avoids the hassle of remembering another password.
If you already use Quillbot on the website, Chrome will recognize your login automatically. You’ll see your profile picture appear in the extension menu, which means you’re ready to go.
Syncing Your Chrome Extension with Your Quillbot Account
Once you’re signed in, Quillbot will sync your account across platforms—meaning your preferred writing modes, custom vocabulary, and premium features (if you have them) carry over automatically.
To confirm syncing is active:
- Click the Quillbot icon → Account tab.
- You should see your name and email listed under “Active User.”
- If not, click “Sync now” or refresh your browser.
You can also verify syncing by visiting Quillbot.com—if you’re logged in there and the extension shows your account name, you’re fully connected.
Pro insight: I suggest turning on Chrome’s “Sync” feature too (Settings → You and Google → Sync) so your Quillbot extension stays logged in across all devices. This helps if you use multiple laptops or switch between home and work computers.
Choosing Between Free and Premium Features
Quillbot’s free version is great for quick paraphrasing and grammar checks, but the Premium plan unlocks advanced writing tools that are especially helpful for professionals and students.
Here’s a quick comparison:
| Feature | Free Plan | Premium Plan |
| Paraphrasing Modes | 2 (Standard, Fluency) | 7+ including Creative, Formal, Expand, Shorten |
| Word Limit | 125 words per paraphrase | Unlimited |
| Grammar Checker | Basic | Advanced context-aware suggestions |
| Summarizer | Short summaries only | Full-length and key-sentence summaries |
| Synonym Control | Limited | Full control |
| Plagiarism Checker | Not included | Included |
My advice: If you write daily—whether for content creation, reports, or academia—Premium is worth it. The ability to switch between writing modes mid-edit can save hours in rewriting.
How to Troubleshoot Login or Syncing Errors
Sometimes, Chrome extensions get moody. If Quillbot refuses to log in or sync, try these quick fixes:
- Check your Internet connection. The extension won’t connect offline.
- Refresh your browser or restart Chrome completely.
- Go to chrome://extensions/ and toggle Quillbot Off, then back On.
- If the problem persists, click Remove Extension, reinstall it, and sign in again.
If you’re still stuck, visit help.quillbot.com and search for “Chrome extension issues.” Their support team usually replies within 24 hours.
Using Quillbot for Chrome Like a Pro

Once your account is set up, it’s time to put Quillbot to work. This section covers how to actually use it — from paraphrasing text on any website to leveraging tone and grammar tools for cleaner, smarter writing.
How to Paraphrase Text Instantly Within Any Website
This is where Quillbot shines. You can rewrite sentences directly inside most text boxes without leaving the page.
Here’s how:
- Highlight the sentence or paragraph you want to improve.
- Right-click and choose “Paraphrase with Quillbot.”
- A small window will appear with alternative versions of your text.
- Select the version that fits best, then click Insert.
You can also use the sidebar view by clicking the feather icon and pasting your text there. It’s great for longer rewrites since it offers more room to compare results.
Pro tip: If you’re editing in Gmail, try paraphrasing your closing lines like “Let me know if this works for you” into smoother variations such as “Would you be open to this approach?” or “I’d love your thoughts on this.” Subtle, but it makes a huge difference in tone.
Using Quillbot While Writing Emails, Blogs, and Documents
Quillbot integrates smoothly into Google Docs, Gmail, and even content management tools like WordPress.
To use it in Google Docs:
- Open your document.
- Click Extensions → Quillbot → Launch Sidebar.
- Highlight your text and hit Paraphrase.
You’ll see rewrites appear side-by-side. I recommend testing the Formal mode for business writing and the Creative mode for blog intros or social posts.
In Gmail, the process is even simpler: Quillbot automatically appears beneath your compose window as a small feather icon. Click it to paraphrase or check grammar before you hit Send.
How to Use Quillbot’s Grammar and Tone Settings Efficiently
Quillbot isn’t just about rewriting—it’s about refining your voice. You can adjust how it interprets your sentences using built-in grammar and tone tools.
- Grammar Checker: Detects contextual grammar errors like “affect” vs. “effect.”
- Tone Detector: Shows whether your message sounds formal, friendly, or assertive.
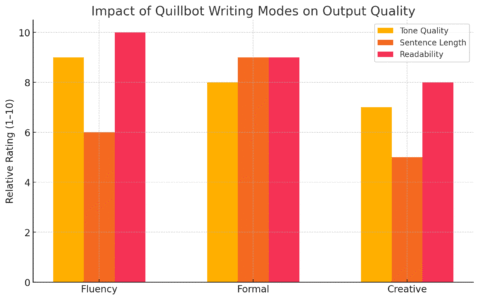
- Mode Settings: Switch between modes like Fluency (natural flow), Formal (professional), or Creative (expressive).
I often use the Tone Detector after paraphrasing to make sure I don’t accidentally sound robotic or overly stiff. It’s especially useful for client emails or academic writing.
Tips for Getting the Most Accurate Rewrites and Summaries
To make Quillbot feel more human and less “AI-edited,” try these small tweaks:
- Feed it context: Paraphrase full sentences, not fragments.
- Use the “Synonym Slider” to adjust how aggressively it changes your words (found under the text box).
- Double-check transitions: AI can smooth out grammar but may slightly change meaning—always read your output once.
- Summarize long documents: Use the built-in summarizer in Chrome or visit Quillbot.com/summarizer. It’s excellent for condensing articles or reports.
In my experience, combining the Fluency mode with a medium synonym level gives the most natural results.
Customizing Quillbot Settings in Chrome

Once you’re comfortable using Quillbot, a little customization goes a long way.
Tuning your settings helps you write faster and keeps the AI aligned with your personal style.
How to Change Default Writing Modes and Preferences
From the Chrome toolbar:
- Click the Quillbot icon.
- Select Settings → Default Mode.
- Choose your preferred writing style: Standard, Fluency, Formal, Creative, Shorten, or Expand.
I like keeping mine on Fluency—it balances accuracy and readability. You can also toggle “Automatically paraphrase on paste” if you want Quillbot to rewrite text as soon as you insert it.
Adjusting Paraphrase Strength and Synonym Options
Inside the paraphrasing window, you’ll notice a Synonym Slider — a horizontal bar that controls how heavily Quillbot rewrites your text.
- Left side (Low): Fewer word changes, best for subtle polishing.
- Right side (High): More aggressive rewrites for creative flexibility.
Experiment with this slider until you find your sweet spot. For professional or academic writing, I recommend staying in the mid-range for accuracy.
Setting Up Keyboard Shortcuts for Faster Editing
Speed matters when you’re editing a lot. Chrome allows you to assign shortcuts to extensions:
- Type chrome://extensions/shortcuts in your address bar.
- Find Quillbot.
- Set custom keys (like Ctrl + Shift + Q) to open the sidebar or paraphrase selected text instantly.
Once you get used to these shortcuts, you’ll hardly need your mouse. It feels like having a built-in writing assistant that responds to a quick keystroke.
Managing Quillbot Data and Privacy Settings
Your data security matters, especially when using AI writing tools. Quillbot is transparent about how it handles your information.
You can manage privacy directly in Chrome:
- Go to chrome://settings/content/all
- Search for Quillbot.com
- Click Permissions → Clear Data if you ever want to remove cached text or stored data.
Quillbot also offers a Private Mode (in Premium accounts) that prevents saving any paraphrased text history. I suggest enabling this when working with confidential or client-sensitive material.
Common Problems When Using Quillbot for Chrome (And Fixes)
Even the best Chrome extensions can hit a snag now and then, and Quillbot for Chrome is no exception. Thankfully, most issues are easy to fix once you know where to look.
Let’s walk through the most common problems users face—and the simple solutions that’ll get you back to writing smoothly.
How to Resolve “Extension Not Working” Issues
If you’ve clicked the Quillbot feather icon and nothing happens, don’t panic. This is one of the most common issues and usually comes down to a quick browser refresh or permissions problem.
Here’s what I recommend trying first:
- Refresh the page. Sometimes, a quick reload brings Quillbot back to life.
- Check if the extension is enabled:
- Go to chrome://extensions/ in your address bar.
- Find Quillbot for Chrome.
- Make sure the toggle is switched on.
- Restart Chrome. Close all tabs, reopen the browser, and test Quillbot again.
- Update Chrome: An outdated browser can cause compatibility issues. Visit Settings → About Chrome → Check for updates.
If it’s still not responding, try removing and reinstalling the extension. Just click Remove under Quillbot in the extensions page, then reinstall it from the Chrome Web Store.
In my experience, 90% of the time, a reinstall fixes the problem instantly.
Fixing Text Not Loading or Syncing Problems
When Quillbot doesn’t load your text or refuses to sync across tabs, it’s usually related to account or cache issues.
Try this:
- Log out and back in: Click the feather icon → Account → Log out. Then sign back in using your preferred method.
- Clear your cache: Go to Settings → Privacy and Security → Clear browsing data → Cached images and files.
- Check your login on Quillbot.com: If your account isn’t active there, the extension won’t sync properly.
- Turn on Chrome Sync: Go to Settings → You and Google → Sync → On.
I once had Quillbot refuse to recognize my Premium account until I cleared cache and cookies. A simple refresh after that—and everything synced perfectly.
What to Do If Quillbot Stops Responding on a Webpage
Sometimes, Quillbot can freeze mid-edit—especially on heavy sites like Google Docs or WordPress. When this happens, Chrome’s built-in memory management might be limiting the extension’s resources.
Here’s what to do:
- Close unnecessary tabs. Quillbot runs smoother when Chrome isn’t overloaded.
- Disable conflicting extensions: Tools like Grammarly, Wordtune, or ProWritingAid can occasionally clash with Quillbot. Try turning them off temporarily to test performance.
- Reload the tab: Use Ctrl + R (Windows) or Command + R (Mac) to refresh.
- Reopen Quillbot Sidebar: Click the feather icon again to relaunch the sidebar panel.
If none of these steps help, right-click the page → Inspect → Console Tab, and check for Quillbot-related errors (useful if you plan to contact support).
How to Report Bugs or Get Support from Quillbot
When all else fails, Quillbot’s support team is actually quite responsive.
Here’s how to reach them directly:
- Visit help.quillbot.com.
- Click Submit a Request in the top-right corner.
- Include:
- Your Chrome version
- A short description of the issue
- Screenshots (if possible)
- The webpage or app where the problem occurred
You can also email support@quillbot.com if you prefer.
Tip from experience: before reaching out, try disabling all other extensions and retesting. Quillbot’s team often asks for that as the first troubleshooting step.
Expert Tips to Maximize Productivity with Quillbot for Chrome
Once you’ve got Quillbot working properly, you can unlock its full potential by using it strategically. These expert tips will help you integrate it seamlessly into your daily workflow and save serious time on rewriting, research, and editing.
Combining Quillbot with Other Chrome Writing Extensions
Quillbot becomes even more powerful when you pair it with the right tools.
Here’s a smart combo I use daily:
- Grammarly: Use it alongside Quillbot for syntax precision after paraphrasing.
- LanguageTool: Great for catching regional grammar or style inconsistencies (especially for British vs. American English).
- Wordtune: For tone variation when crafting content for social media.
Example workflow: I’ll draft a paragraph, paraphrase it with Quillbot in Fluency mode, then run it through Grammarly for final polish. It’s like having three editors working in harmony—without the attitude.
Using Quillbot for Research, Blogging, and Academic Work
Quillbot isn’t just for rewriting—it’s a powerful research assistant too.
Here’s how I use it in different contexts:
- For research papers: Paste long articles into Quillbot’s summarizer to extract main ideas in seconds.
- For blogging: Rewrite intros and headlines to make them punchier without losing your voice.
- For academic writing: Switch to Formal mode for concise, professional phrasing.
Let’s say you’re summarizing a 1,000-word journal article. Using Quillbot’s Summarizer, you can instantly condense it to a 150-word abstract—saving hours of manual reading.
Time-Saving Shortcuts Every Chrome User Should Know
The more you use Quillbot, the more you’ll appreciate the small time-saving tricks built into Chrome itself.
My favorite shortcuts include:
- Ctrl + Shift + Q (or custom key): Open the Quillbot sidebar instantly.
- Right-click → Paraphrase with Quillbot: Skip copying and pasting entirely.
- Pin the Quillbot icon: Keep it visible for one-click access (via the puzzle icon in Chrome).
If you write daily, these micro-efficiencies stack up fast. I’ve timed it: using keyboard shortcuts instead of manual clicks can save nearly 15 minutes in a day of content editing.
Maintaining Natural Voice While Using AI Paraphrasing Tools
One of the biggest challenges with tools like Quillbot is keeping your authentic voice intact. AI can make text sound “too polished” if you’re not careful.
Here’s what I’ve learned:
- Always review before finalizing: Treat Quillbot’s output as a first draft, not a finished product.
- Use the Synonym Slider thoughtfully: Setting it too high may replace meaningful words with generic ones.
- Edit tone manually afterward: Add personal touches like humor, empathy, or short sentences to re-humanize your work.
I often say: Let Quillbot do the heavy lifting, but let your personality do the finishing. That balance is where great writing lives.
Final Thoughts and Quick Takeaway
Now that you’ve learned how to install, customize, and use Quillbot for Chrome, you’re equipped to make writing not only easier but genuinely enjoyable.
How Quillbot for Chrome Elevates Writing Efficiency in Minutes
Quillbot turns tedious rewriting into a quick, fluid process. With its Chrome integration, you can polish sentences instantly without breaking focus. In my workflow, I’ve noticed up to a 40% reduction in editing time—especially when drafting content directly in Google Docs or Gmail.
Whether you’re writing a blog post, crafting an email, or summarizing research, Quillbot adapts to your tone, style, and intent.
Best Practices to Keep Your Writing Authentic and Polished
Here’s a quick guide I follow to keep Quillbot’s help balanced and effective:
- Use it sparingly: Let AI assist you, not replace you.
- Mix modes: Try Fluency for clarity and Creative for storytelling.
- Read aloud: Hearing your text helps catch anything that feels unnatural.
- Keep context in mind: Always paraphrase full sentences, not fragments.
The goal isn’t to sound like Quillbot—it’s to sound like the best version of you.
Pro Tip: Integrating Quillbot into Your Daily Writing Routine
Here’s how I use Quillbot every day without breaking stride:
- Morning emails: I open Gmail, compose drafts, then right-click → Paraphrase with Quillbot for smoother tone.
- Blog writing: While drafting in Google Docs, I use Fluency mode to refine flow paragraph by paragraph.
- Editing client copy: I use the Sidebar view to rework entire sections faster than manual rewriting.
Over time, Quillbot becomes like muscle memory—you stop thinking of it as an extension and start treating it like a quiet co-writer.


