Table of Contents
AWeber Pro has become one of the go-to tools for marketers who want to create smarter, more personalized, and automated email campaigns. But how can you truly unlock its full potential to grow your business and engage your audience more effectively?
In this guide, we’ll explore the key ways to use AWeber Pro to automate your marketing, boost open rates, and make every email count.
Setting Up AWeber Pro for Success
Before you dive into sending emails, you need to set up your AWeber Pro account properly.
This setup determines how well your campaigns perform later—especially when it comes to deliverability, organization, and automation.
Understanding the AWeber Pro Dashboard
When you first log into AWeber Pro, the dashboard can look like a control center for your entire email marketing strategy. It’s divided into sections like Subscribers, Messages, Lists, Reports, and Automations.
To make sense of it all:
- Subscribers tab: This is where you can see all your contacts, manage tags, and import lists.
- Messages tab: Here you’ll create broadcasts (one-time emails) or campaign sequences (automated emails).
- Reports tab: Provides performance insights like open rates, click-throughs, and unsubscribes.
- Automations tab: Lets you set rules and workflows for triggering messages automatically.
I suggest spending ten minutes exploring each tab to get comfortable. It’s like learning the dashboard of a new car—you don’t have to know everything right away, but knowing where the buttons are helps you drive smoothly.
Connecting Your Website and Importing Subscribers
You can’t email anyone until AWeber knows who to send messages to. The simplest way to connect your website is through a signup form or integration.
Here’s how to do it step-by-step:
- Go to Sign Up Forms → Create a Sign Up Form.
- Choose a template and customize it with your brand colors.
- Copy the HTML code or connect via a plugin (like AWeber for WordPress).
- Test it to make sure submissions are flowing into your subscriber list.
If you already have contacts from another platform (say Mailchimp or Kit), go to Subscribers → Add Subscribers → Import CSV File. Just be sure to include permission-based subscribers—AWeber is strict about anti-spam compliance.
Customizing Your Sender Information and Domain Authentication
Your sender name and email address tell people who you are—and also tell inbox filters whether to trust you.
In Account Settings → Personal Info, set your “From” name to something recognizable (like “Emma from BrightMarketing”) and use a domain email instead of a free one (e.g., emma@brightmarketing.com instead of Gmail).
Next, authenticate your domain to improve deliverability. You’ll find this under Domains and Addresses → Authenticate Domain. It may sound technical, but AWeber guides you through adding DNS records like SPF and DKIM at your domain provider (GoDaddy, Namecheap, etc.).
Think of it as proving your identity to the email gods—it helps your messages land in inboxes, not spam folders.
Using Tags and Segments for Better Organization
Tags and segments are AWeber Pro’s secret sauce for personalization.
- Tags are like sticky notes you attach to subscribers based on behavior. For example, if someone downloads your eBook, tag them as “ebook-lead.”
- Segments group subscribers based on shared traits or actions—like “clicked last week’s email” or “purchased product A.”
In Subscribers → Manage Subscribers → Filter By Tag, you can see and organize these groups. I suggest tagging subscribers right from signup—such as “new-subscriber” or “webinar-interest.”
Later, you can send specific emails to each tag group instead of blasting everyone with the same message.
The better your organization now, the easier your automation strategy will be later.
Creating High-Converting Email Campaigns in AWeber Pro
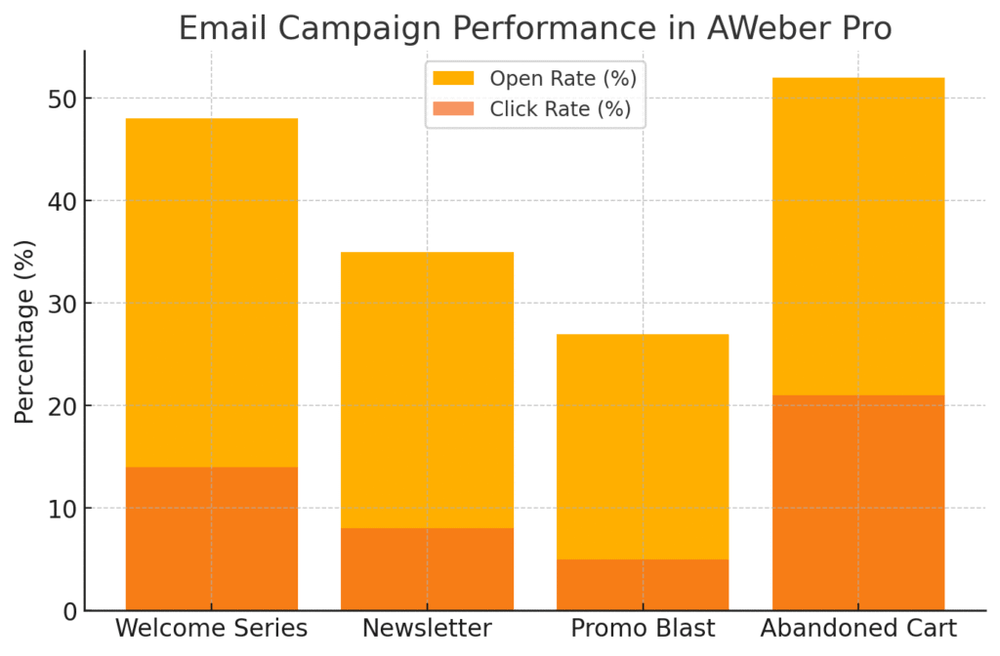
Once setup is complete, it’s time to build campaigns that actually get results. AWeber Pro gives you the tools to craft emails that look beautiful, read well, and convert subscribers into loyal fans.
Using the Drag-and-Drop Email Builder Effectively
AWeber’s drag-and-drop builder is one of the easiest I’ve used. You can access it from Messages → Create a Message → Drag & Drop Email Builder.
To make your workflow smoother:
- Start with a template that fits your brand’s tone (clean, minimal, or bold).
- Use image blocks sparingly—too many can trigger spam filters.
- Add buttons for clear calls to action (e.g., “Download Now” or “Book a Demo”).
A small but powerful tip: Save your favorite designs as templates. That way, your emails stay visually consistent and you don’t waste time starting from scratch.
Writing Subject Lines That Boost Open Rates
Subject lines are your first impression. In AWeber’s message editor, you’ll find the “Subject” field at the top—don’t rush it.
Keep it short, specific, and human.
Here’s a trick I use: ask a simple question or create curiosity. For instance,
- “Still using the old way to write emails?”
- “You missed this marketing shortcut.”
AWeber’s built-in A/B testing lets you test two versions of a subject line to see which performs better. After a few tests, you’ll start to see patterns—what language resonates, what timing works, and what tone drives opens.
Designing Responsive Email Templates That Match Your Brand
AWeber Pro automatically makes templates responsive (mobile-friendly), but you should still preview every email before sending. Click Preview & Test → Mobile View to ensure buttons, images, and fonts align properly.
Use consistent brand colors, fonts, and logo placement. For example, if your site uses navy blue and rounded buttons, mirror that style in your emails. People should feel like they’re in the same world across all your touchpoints.
A clean layout beats clutter every time. White space is your friend.
Incorporating Dynamic Content for Personalized Messages
Dynamic content lets you customize email text depending on subscriber data.
For instance,
“Hi {first_name|there}, here’s something special for you!”
AWeber Pro also allows conditional content. You can write one email that changes based on tags or segments:
{% if tag 'webinar-interest' %} Ready for next week’s live session? Here’s your exclusive link.
{% else %} Want to join our free webinar? Spots are filling fast!
{% endif %}This makes each message feel tailored, even though it’s automated—a small step that dramatically increases engagement.
Automating Email Marketing with AWeber Pro Features
Automation is where AWeber Pro truly shines. Once you set things up, your system keeps working for you—even while you’re sleeping or focusing on other parts of your business.
Setting Up Automated Welcome Series and Onboarding Emails
In Automations → Campaigns → Create a Campaign, choose “Welcome Series.” AWeber gives you a starter template where you can:
- Send an immediate welcome email.
- Follow up 1–2 days later with helpful content.
- Send an offer or invite by day 5.
This sequence builds trust right away. I recommend making your first email personal and conversational—thank them for joining, share what to expect, and include one strong call to action.
Creating Behavioral Triggers to Send Targeted Messages
Behavioral triggers let you respond to what your subscribers actually do—like clicking a link or opening an email.
For example:
- If someone clicks on a product link, tag them as “interested-product-A.”
- If they don’t open after three emails, move them into a re-engagement sequence.
To set this up, go to Automations → Rules → Create a Rule. It might sound complex, but it’s really just “If this, then that.” (If subscriber clicks → Tag as “interested.”)
These small tweaks can double your engagement without sending more emails.
Using AWeber Campaigns for Drip Sequences
A drip campaign is a series of timed emails that nurture subscribers. Inside Automations → Campaigns → Create → Blank Campaign, you can drag and drop “Send Message” and “Wait” blocks.
Example:
- Day 1: Welcome email
- Day 3: Share a quick win or story
- Day 5: Introduce your core offer
Each message builds momentum. The beauty is—you only write it once. After that, AWeber handles the timing perfectly.
Combining Tags, Segments, and Automations for Smarter Targeting
Here’s where things get powerful. You can use tags and segments together to create laser-focused automations.
For example:
- Tag new leads as “new-subscriber.”
- Segment those who click a product link.
- Automatically trigger a sales follow-up campaign only for that group.
This ensures your audience gets the right message at the right time—no irrelevant emails, no fatigue.
When done right, it feels like you’re having hundreds of one-on-one conversations at scale. That’s what makes AWeber Pro such a powerful ally for smarter, human-centered email marketing.
Pro Tip: Don’t automate everything. The best campaigns combine automation with personal check-ins—like sending a manual email when someone replies. It reminds your subscribers there’s a real person behind the screen.
Start automating your marketing in minutes.
Try AWeber Pro for free and build your first smart email sequence today.
Using AWeber Pro Analytics to Improve Performance
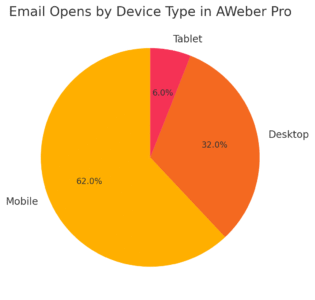
The beauty of AWeber Pro isn’t just in sending emails—it’s in understanding what happens after you hit send. Analytics give you visibility into how your subscribers engage, so you can tweak your strategy and get better results over time.
Understanding Key Metrics: Opens, Clicks, and Conversions
AWeber Pro’s Reports tab is where the real learning begins. Once you’ve sent a few campaigns, head there to see how your audience responds.
You’ll find metrics like:
- Open rate: The percentage of subscribers who opened your email.
- Click-through rate (CTR): The percentage who clicked a link inside.
- Conversion rate: The percentage who took the desired action, such as buying or signing up.
If you notice your open rates dropping below 20%, it might mean your subject lines need work or your send times are off.
For example, one client of mine increased open rates from 18% to 31% simply by shifting their send time from Monday mornings to Wednesday afternoons—small tweak, huge difference.
In AWeber Pro, you can drill deeper by clicking any specific campaign under Reports → Broadcasts → View Details.
This breaks down metrics by device, link, and even geographic location. That kind of data helps you make more human decisions—like knowing when your audience actually reads emails instead of guessing.
Testing and Refining Campaigns with A/B Split Testing
If there’s one feature in AWeber Pro that separates guesswork from strategy, it’s A/B split testing.
You’ll find it under Messages → Split Tests → Create A/B Test. Here’s how I usually set it up:
- Create two versions of the same email—change only one variable, such as the subject line or button color.
- Send each version to a small portion of your list (say, 10–20%).
- Let AWeber automatically send the winning version to the rest.
This is how you learn what your audience actually prefers—not what you assume they like. For example, I once tested “Grab your free guide” vs. “Get your free guide now,” and the second version got a 22% higher click rate. The smallest details often matter the most.
AWeber Pro stores test results so you can spot recurring patterns—ideal for improving long-term strategy rather than one-off campaigns.
Tracking Subscriber Engagement Over Time
Engagement is more than a single open or click—it’s a long-term relationship. AWeber Pro helps you see how subscribers behave across multiple campaigns.
Go to Subscribers → Manage Subscribers → Engagement. Here, you’ll see metrics like “Engaged,” “Unengaged,” or “At Risk.”
- Engaged subscribers: Regularly open and click your emails.
- Unengaged subscribers: Haven’t interacted for 90+ days.
- At risk: Recently active but showing signs of fading interest.
I like to check these lists monthly. When engagement starts dipping, I’ll run a reactivation campaign—something simple like, “Still want to hear from us?” This personal touch often brings back 10–15% of “sleeping” subscribers.
Using Analytics Data to Optimize Your Email Strategy
Data is only powerful if you act on it. AWeber Pro’s reporting tools let you pivot quickly and make smarter, data-driven decisions.
Here’s how I recommend using analytics:
- Identify your best-performing content. What emails get the most clicks? Do more of that.
- Track conversions by campaign type—newsletters, promos, or automated sequences—and double down on what converts.
- Compare performance month-to-month to catch trends early.
You can even export your reports (Reports → Export Data) to combine with Google Analytics or CRM data for deeper insights.
Think of your analytics like a compass: it doesn’t just show where you are—it shows where to go next.
Growing Your Email List with AWeber Pro Tools
Your email list is your business’s heartbeat. AWeber Pro gives you multiple ways to grow it—ethically, effectively, and automatically.
Creating Sign-Up Forms That Convert
To start collecting subscribers, go to Sign Up Forms → Create a Sign Up Form.
Keep it simple. I recommend no more than three fields: name, email, and one optional field (like “How did you find us?”).
Some quick optimization tips:
- Use a clear headline like “Get free marketing tips weekly.”
- Add a strong incentive, such as a downloadable guide.
- Always include a privacy reassurance line (“We never spam. Unsubscribe anytime.”).
Once your form is ready, embed it on your homepage or blog sidebar. Small tweaks—like changing your button text from “Submit” to “Get Started”—can increase conversions by up to 20%.
Integrating AWeber with Landing Pages and Lead Magnets
AWeber Pro integrates directly with landing page builders like Leadpages, Unbounce, and WordPress plugins such as Elementor.
Here’s a quick setup example:
- Create a lead magnet (like a PDF or mini-course).
- In your landing page tool, connect AWeber via the integration settings.
- Choose the correct subscriber list.
- Automate delivery with a “Thank You” email in AWeber.
This simple workflow allows you to turn cold traffic into new subscribers instantly. I’ve seen clients double their lists in under two months by combining AWeber’s automations with a single high-value lead magnet.
Leveraging Pop-Ups and Inline Forms for Maximum Impact
Inline forms blend into your content, while pop-ups grab attention. AWeber makes both easy to implement through Sign Up Forms → Create → Pop-Up or Inline Form.
Use inline forms at the bottom of blog posts, and set pop-ups to appear after a 10-second delay or when a visitor scrolls halfway.
A quick pro tip: Test your pop-up timing. A/B testing between 10 and 30 seconds can drastically change your signup rates.
Using QR Codes and Social Media Integrations to Capture Subscribers
AWeber Pro lets you generate a QR code linked to any signup form. This is perfect for physical marketing materials—like posters, business cards, or product packaging.
To find it, go to Sign Up Forms → Get Form Code → QR Code Tab.
You can also connect your signup forms directly to Facebook or Instagram pages, letting followers subscribe without leaving the app. It’s a low-friction, high-conversion tactic that works especially well for e-commerce brands or local services.
Grow your list faster with the right tools.
Sign up for AWeber Pro and turn your website traffic into loyal subscribers.
Personalizing Email Marketing with AWeber Pro Tags
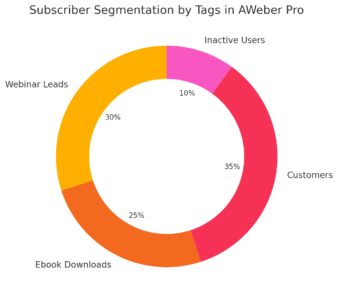
Personalization turns automation into real connection. AWeber Pro’s tagging system lets you talk to each subscriber as if you wrote just for them.
Creating Dynamic Segments Based on Subscriber Behavior
In Subscribers → Manage Subscribers → Create Segment, you can filter users based on actions like:
- Opened last 3 emails.
- Clicked a specific link.
- Subscribed through a particular form.
Once filtered, you can send custom content to each group. For instance, if someone downloaded your SEO guide, follow up with an email about keyword research tools.
This kind of targeting often leads to 2–3x higher engagement rates because the message feels relevant and timely.
Using Tags to Send Tailored Offers and Content
Tags are small identifiers you attach to subscribers automatically based on their activity.
Example: If a subscriber clicks a “Buy Now” link, you can tag them as “interested-product-A.” Then, create a follow-up sequence just for that tag offering a related discount.
Here’s how to set it up:
- In Automations → Campaigns → Create Rule, choose “If Clicks Link → Add Tag.”
- Build a short email series for that tag.
- Let AWeber handle the rest.
I’ve used this to run micro-promotions that outperform regular campaigns by nearly 40%.
Re-engaging Inactive Subscribers with Personalized Sequences
Not everyone stays engaged forever—and that’s okay. With tags and segments, you can revive those relationships.
Create a re-engagement sequence like this:
- Send a friendly “We miss you” email.
- Offer something valuable (like a resource or discount).
- If no response, move them to an “inactive” segment.
In one campaign I ran, simply acknowledging inactivity (“Haven’t seen you in a while—still interested in updates?”) brought back 12% of subscribers who hadn’t opened an email in 6 months.
Building Loyalty Campaigns with Tag-Based Triggers
Once you’ve got engagement flowing, loyalty campaigns keep your best customers coming back.
You can trigger these using purchase or engagement tags:
- “VIP Customer” tag → Send exclusive sneak peeks.
- “Top Clicker” tag → Reward them with early-bird offers.
In Automations → Campaigns → Create → From Tag Trigger, set your sequence to begin when a specific tag is applied.
The beauty of AWeber Pro is that once this is built, it runs seamlessly. Every subscriber feels noticed and valued—without you manually tracking a single interaction.
Pro Tip: I always remind people—personalization isn’t just about using someone’s name. It’s about showing that you notice what matters to them. When your emails start to feel like a real conversation, not a broadcast, that’s when your AWeber Pro strategy truly clicks.
Integrating AWeber Pro with Other Marketing Tools
AWeber Pro becomes even more powerful when it’s connected to the rest of your marketing stack.
Integration isn’t just about convenience—it’s how you make your tools work together to create seamless customer experiences.
Connecting AWeber Pro with E-commerce Platforms
If you sell products online, this step is non-negotiable. AWeber Pro connects smoothly with major e-commerce platforms like Shopify, WooCommerce, and Etsy, helping you automate follow-ups and track purchase behavior.
To connect Shopify, for example:
- Go to Integrations → Browse Integrations → Shopify.
- Click Connect Integration and log in to your store.
- Choose which list should receive new customer data.
Once connected, AWeber automatically tags subscribers based on purchases. I recommend using tags like “purchased-product-A” or “cart-abandoner.” You can then create personalized campaigns, such as product recommendations or abandoned-cart reminders.
One of my clients used this setup to recover 18% of abandoned carts within a month—just by letting AWeber handle the follow-ups automatically.
Syncing AWeber with CRM and Customer Databases
If you’re using a CRM system like HubSpot, Zoho, or Pipedrive, integrating it with AWeber ensures both tools stay in sync. This means every new lead or deal update automatically reflects in your AWeber list—no manual updates needed.
You can do this through native integrations (where available) or by using Zapier for custom setups. For instance, you can set a trigger that says:
- When a deal moves to “Won” in CRM → Add tag “customer” in AWeber.
This creates a powerful feedback loop—your CRM tracks customer relationships, while AWeber nurtures them automatically with post-purchase emails or loyalty campaigns.
Automating Workflows Through Zapier Integrations
Zapier is like digital glue—it connects AWeber Pro with over 5,000 other apps.
Here’s a practical example:
- You use Typeform for surveys and want respondents added to a list in AWeber.
- Create a Zap: Typeform (new entry) → AWeber (add subscriber to list).
I suggest automating repetitive actions like:
- Adding new webinar sign-ups to AWeber.
- Tagging contacts when they buy through PayPal or Stripe.
- Sending internal notifications when a VIP subscriber joins.
Over time, these micro-automations save hours of manual work and ensure your audience always gets timely, relevant communication.
Combining AWeber with Social Media and Ad Campaigns
Social media is often where leads first discover your brand—and AWeber Pro helps you turn that attention into lasting relationships.
If you run Facebook or Instagram ads, connect your lead form directly to AWeber via Integrations → Facebook Lead Ads → Connect. This allows subscribers to go straight into your list with zero friction.
For organic efforts, use AWeber’s Smart Links (found under Reports → Click Tracking) to track how many sign-ups come from each post.
I once ran a 2-week test and found that LinkedIn posts were driving 40% more high-quality leads than Instagram—data that completely shifted my content focus.
Avoiding Common Mistakes When Using AWeber Pro
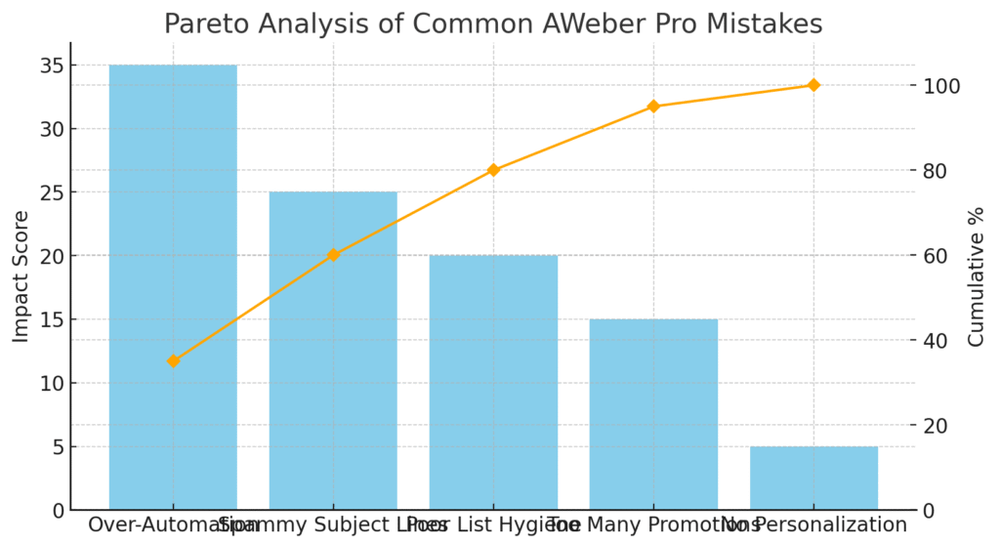
Even seasoned marketers trip up sometimes. Avoiding these common pitfalls can save you time, protect your deliverability, and keep your subscribers engaged long-term.
Not Over-Automating Your Email Sequences
Automation is wonderful—until it starts feeling robotic. I’ve seen people create 20-email sequences that feel more like spam than value.
AWeber Pro gives you automation flexibility, but I suggest keeping it human. Space out your emails naturally, and always include at least one touchpoint where you personally invite replies.
For example: “I’d love to know your thoughts—just hit reply.”
That line alone can cut unsubscribe rates by 15–20%, because it reminds people there’s a real person behind the emails.
Avoiding Spam Triggers and Maintaining Deliverability
Deliverability is everything. Even the best email is useless if it lands in spam.
To stay out of trouble:
- Avoid spammy phrases like “Act now!!!” or “100% free.”
- Use verified domains (set up SPF and DKIM under Account → Domains).
- Keep your image-to-text ratio balanced (too many images can trigger filters).
I’ve found that using plain-text style emails occasionally boosts open rates, especially when sending to colder segments. They look less promotional and more like personal messages.
Keeping Your Lists Clean and Updated
List hygiene is crucial. A bloated list full of inactive addresses hurts your deliverability and inflates costs.
Once a quarter, go to Subscribers → Manage Subscribers → Filter by Engagement. Identify those who haven’t opened in 90 days and either send a reactivation campaign or remove them.
It’s tough to delete subscribers, I know—but a smaller, healthier list often performs better.
Balancing Promotional and Value-Driven Emails
If every email you send includes a “Buy Now” button, subscribers will tune out fast. I suggest a 70/30 mix:
- 70% helpful, educational, or story-driven content.
- 30% direct promotion.
For example, before pitching a new service, send an email that teaches something relevant first. This builds trust and primes your audience for conversion naturally.
Expert Tips to Maximize Results with AWeber Pro
Once you’ve mastered the basics, it’s time to optimize. These are the small, data-driven tweaks that separate good campaigns from great ones.
Using Behavioral Data to Refine Future Campaigns
AWeber’s analytics (under Reports → Broadcasts) show detailed behavior—who clicked what, when, and how often. Use this to fine-tune your strategy.
For example, if you notice that your audience frequently clicks “how-to” links, that’s a sign they crave educational content. Adjust your next few emails accordingly.
I recommend creating a “Top Clickers” segment and rewarding them with exclusive content. It not only strengthens loyalty but also signals that engagement matters to you.
Experimenting with Send Times for Better Engagement
Timing affects everything. In my experience, midweek mornings (Tuesday–Thursday) tend to perform best, but this varies by audience.
AWeber Pro lets you schedule sends under Messages → Schedule → Choose Time.
Run small tests—try sending the same type of email at two different times and compare open rates.
After a few weeks, patterns will emerge. One SaaS client of mine discovered that 7 p.m. sends outperformed 10 a.m. by 35%. Don’t be afraid to challenge assumptions.
Segmenting by Purchase Intent and Customer Journey
Segmentation isn’t just about demographics—it’s about where someone is in their journey with you.
Here’s how I usually break it down:
- New Subscribers: Educational content, introductions, and small asks.
- Engaged Prospects: Case studies, testimonials, or light offers.
- Repeat Customers: Upsells, loyalty perks, or VIP treatment.
In AWeber, you can apply these as tags using automations. Over time, this approach creates a natural rhythm—each person receives what fits their stage, not a one-size-fits-all blast.
Developing a Long-Term Automation Strategy
Think of automation as a living system, not a one-time project. Review your workflows monthly to ensure they still make sense.
I suggest mapping out your full funnel visually—lead magnet → welcome series → nurture sequence → sales → re-engagement. AWeber’s Campaigns tool makes this easier with its drag-and-drop logic.
Add or update content as your business evolves. Automation done right grows with you, quietly working in the background to build consistent revenue and relationships.
Final Thoughts: Building Smarter Relationships with AWeber Pro
Email marketing with AWeber Pro isn’t about blasting messages—it’s about building relationships that last.
When you combine smart automation, data insights, and genuine communication, you create something powerful: trust.
Turning Insights into Ongoing Engagement
Use what you learn from every campaign to keep improving. If subscribers respond to storytelling, lean into that. If they engage more with visual emails, design for that.
The data is your guide, but empathy is your compass.
Creating Evergreen Email Funnels That Convert
Evergreen funnels—like automated welcome or product sequences—are AWeber Pro’s quiet workhorses. They bring in leads and sales consistently without daily management.
Set them once, test often, and refresh the content every few months to keep it relevant.
Aligning AWeber Pro Strategy with Your Business Goals
Every campaign should serve a bigger purpose. Whether that’s driving sales, nurturing leads, or educating your audience, make sure your email strategy supports your overall business direction.
I often revisit this question quarterly: Is my email strategy moving my business forward—or just keeping it busy?
Maintaining a Consistent and Human Email Marketing Voice
At the end of the day, your subscribers don’t want another marketer—they want a real person. Keep your tone conversational. Speak like you would to a friend who’s interested in what you offer.
AWeber Pro gives you the tools to automate communication, but it’s your voice that makes those messages matter.
Pro Tip: I always remind my clients—automation and analytics are tools, not replacements for empathy. When you use AWeber Pro to communicate with real care and curiosity, you’ll find that your emails don’t just perform better—they start meaningful conversations.

