Table of Contents
Starting with a monday app download is the fastest way to organize your work and keep everything in one place.
But once you’ve installed it, what comes next? Many new users wonder how to set up their account quickly without getting lost in endless features.
In this guide, I’ll walk you through each step so you can go from download to productivity in just a few minutes.
How To Complete Your Monday App Download And Install
Downloading and installing monday.com is quick, but it’s worth making sure you’re set up on the right device and version before you start.
Whether you’re using iOS, Android, or a desktop computer, the process is simple once you know where to go.
Check Compatibility Before You Download
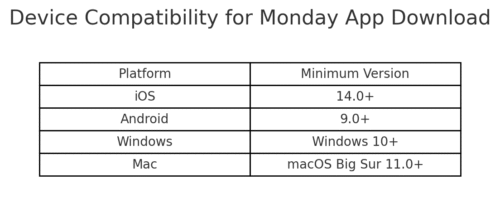
Before you tap that download button, check that your device is supported. Monday.com’s mobile app works on:
- iOS 14.0 or later (iPhone and iPad)
- Android 9.0 or later
- Desktop versions for Windows (10 and above) and macOS (Big Sur 11.0 and later)
If you’re running an older device, you may still be able to use monday.com through the web browser at monday.com.
I suggest updating your OS whenever possible because the app runs faster and gives you access to all the latest features.
Steps To Download The App On iOS Devices
Here’s how to get monday.com on your iPhone or iPad:
- Open the App Store.
- In the search bar, type monday.com.
- Tap the download button (cloud icon or “Get”).
- Once it installs, tap Open.
Pro tip: If you’re setting up for a team, download the app on your iPad as well. The larger screen makes it easier to manage boards in meetings.
Steps To Download The App On Android Devices
If you’re on Android, the process is just as easy:
- Open the Google Play Store.
- Search for monday.com.
- Tap Install.
- Once installed, tap Open to launch.
From what I’ve seen, Android notifications for monday.com are highly customizable. I recommend turning on task notifications right away so you don’t miss status updates.
Installing The Desktop Version For Windows And Mac
If you prefer working on a larger screen or need faster navigation, installing monday.com on your computer is the way to go.
- Windows:
- Go to monday.com/downloads.
- Select the Windows installer.
- Run the downloaded file and follow the prompts.
- Mac:
- Visit the same download page.
- Choose the Mac installer (.dmg file).
- Drag monday.com into your Applications folder.
Why bother with the desktop version if you can use the browser? Two reasons:
- You get faster loading times.
- Desktop notifications help you stay on top of tasks without relying on email.
Creating Your Monday.com Account For The First Time
Once the monday app download and install are complete, the next step is to create your account.
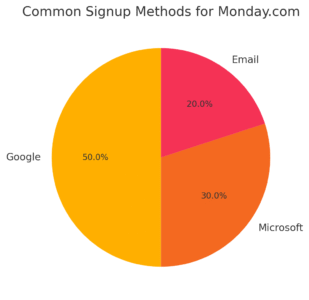
This only takes a few minutes, and you can use your existing Google or Microsoft login if you want to skip the manual signup.
Sign Up With Email, Google, Or Microsoft Login
When you first open the app, you’ll see a welcome screen with three main options:
- Continue with Google – Recommended if you already use Gmail or Google Workspace.
- Continue with Microsoft – Perfect for Outlook or Office 365 users.
- Sign up with email – Use any email address if you don’t want to link it to a work account.
I suggest using your work email if you’re planning to collaborate with a team. It keeps your boards connected to the right people and avoids mixing personal and professional projects.
Choosing The Right Plan During Setup
After signing up, you’ll be asked to choose a plan. Monday.com offers:
- Individual (Free) – Great for personal task tracking or testing the platform.
- Basic & Standard – Best for small teams starting with project management.
- Pro & Enterprise – For larger teams that need automations, integrations, and advanced permissions.
If you’re just starting out, I recommend going with the free version first. You can always upgrade later once you know which features you actually use.
Verifying Your Email And Activating Your Account
Before you can dive in, monday.com will send a verification email. Open your inbox, click the confirmation link, and you’ll be redirected back to the app.
Without verifying, you won’t be able to invite team members or unlock all features. I always suggest doing this step right away — it takes less than 30 seconds, and it keeps your account secure.
✅ Pro Tip: Once you’ve verified your account, bookmark the monday.com login page on your browser and pin the app on your phone’s home screen. This way, you’ll always have quick access no matter what device you’re on.
Navigating The Monday App Dashboard After Login
Once your monday app download is complete and your account is verified, the first thing you’ll see after logging in is the dashboard. Think of this as your command center — everything you do in monday.com branches out from here.
At first glance, it might feel like a lot, but let me break it down for you in simple terms.
Overview Of Boards, Workspaces, And Templates
Here’s how monday.com is structured:
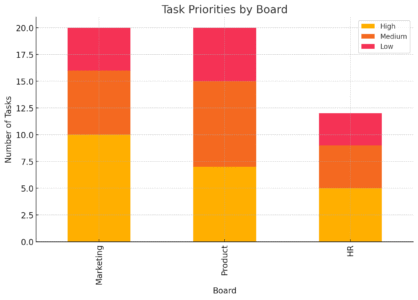
- Workspaces: These are like folders for big projects or teams. For example, you might have a Marketing workspace, a Product workspace, and an HR workspace.
- Boards: Inside each workspace, you create boards. A board is essentially a table where tasks, timelines, and projects live.
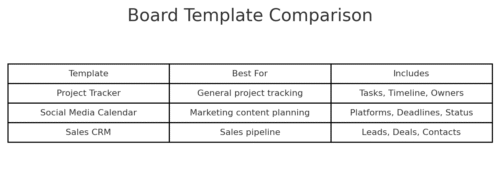
- Templates: Monday.com has pre-built board layouts (templates) you can use to skip manual setup. For instance, if you’re managing social media, you can pick the “Social Media Calendar” template, and it will give you columns for platforms, deadlines, and content status.
I suggest starting with a template. It saves a ton of time, and you’ll quickly get the feel of how tasks flow in the app without having to build from scratch.
Customizing Your Dashboard For Quick Access
Your dashboard isn’t fixed — you can shape it to highlight what matters most. Here are three quick ways:
- Pin Favorite Boards: Hover over a board name and click the star icon. This keeps it at the top of your list.
- Add Widgets: From the dashboard, click “+ Add Widget.” You can add widgets like “Tasks Due This Week” or “Team Workload” to see important data at a glance.
- Rearrange Sections: Drag and drop boards and workspaces to reorder them so your most-used ones are always within reach.
For example: If you’re managing a launch, add a Timeline widget. This gives you a Gantt chart-style view of deadlines right on your homepage — no digging required.
Understanding The Main Menu And Navigation Tools
The left-hand menu is where you’ll spend a lot of time. Here’s what you’ll see:
- Inbox: All updates on tasks assigned to you.
- Notifications: Mentions, reminders, and status changes.
- My Work: A personal feed showing every task you own, across all boards.
- Search: Quickly find boards, people, or files.
Tip I always give new users: Use the My Work tab daily. It filters out the noise and shows only the things with your name on them, so you don’t waste time jumping between boards.
Setting Up Your First Workspace In The App
Now that you know your way around the dashboard, the next big step is creating your first workspace. This is where you’ll organize boards, invite your team, and start building out projects.
How To Create A New Workspace In Minutes
Here’s the fastest way:
- From the sidebar, click the + Add Workspace button.
- Name your workspace (e.g., “Marketing Team” or “Client Projects”).
- Add a short description so team members know what it’s for.
- Decide whether the workspace should be open (visible to everyone) or private (invite-only).
I suggest keeping your first workspace simple — just one or two boards. Don’t overbuild at the start. You’ll figure out what structure you really need as you use it.
Inviting Team Members To Join Your Workspace
Once your workspace is created, you’ll want teammates inside. Here’s how:
- Click Invite at the top right of the workspace.
- Enter email addresses or copy the invite link.
- Assign people to boards once they’ve joined.
Real-world example: Let’s say you’re managing a product launch. Invite the marketing manager, designer, and developer to the same workspace so everyone sees the same boards. You’ll avoid endless email chains and misplaced files.
Assigning Roles And Permissions To Collaborators
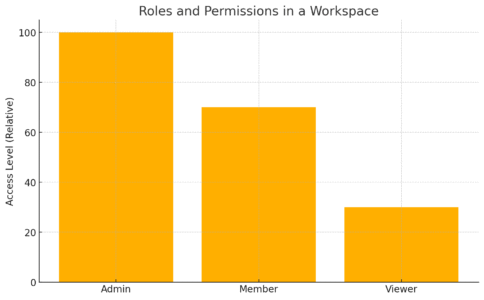
Not everyone needs full access to everything. Monday.com lets you assign roles:
- Admin: Full control over everything (settings, permissions, billing).
- Member: Can create and edit boards, add tasks, and collaborate.
- Viewer: Can only see boards — useful for clients or executives who want visibility but shouldn’t edit tasks.
I recommend giving new teammates “Member” status to start. Keep Admin permissions for just one or two people to avoid accidental changes to billing or workspace settings.
✅ Pro Tip: For sensitive projects, set the workspace to “Private” and only invite relevant people. This avoids clutter and keeps your data secure.
Creating And Managing Your First Board
Once your workspace is set, the next step is creating a board. Think of a board as your digital whiteboard — this is where tasks, projects, and deadlines actually live.
Monday makes it flexible enough that you can start from scratch or use something pre-built.
Choosing From Pre-Built Templates To Save Time
If you’re brand new, I recommend starting with a template instead of building from zero. Templates are like ready-made blueprints for common workflows.
Here’s how to use one:
- From your workspace, click + Add Board.
- Choose Use a Template.
- Browse by category (e.g., Marketing, HR, IT, Sales).
- Select a template and click Use.
For example:
- Social Media Calendar template → comes pre-loaded with platforms, deadlines, and statuses.
- Project Tracker template → includes timelines, task owners, and progress columns.
Pro tip: Even if you think you’ll customize later, templates save you the headache of figuring out column types from scratch.
Adding Columns To Track Tasks, Deadlines, And Status
Columns are the heart of your board. Each column tracks a different piece of information.
Some must-have columns:
- People Column: Assign tasks to team members.
- Date Column: Add due dates.
- Status Column: Track progress (e.g., “Working on it,” “Stuck,” “Done”).
- Priority Column: Rank tasks as High, Medium, or Low.
To add one:
- From the board, click the + icon at the far right.
- Select the column type you need.
I usually add a Status, Date, and People column right away — that’s the foundation of most projects. Once you’ve got those, you can build more advanced columns later (like Numbers for budgets or Files for attachments).
Tips For Organizing Boards For Maximum Clarity
A messy board slows everyone down. Here’s what I advise:
- Keep names short and clear: Instead of “Social media post for Instagram story launch campaign,” call it “IG Story Launch.”
- Use groups: Separate tasks into groups like “This Week,” “Next Week,” or “Completed.”
- Color-code statuses: Make “Stuck” red, “In Progress” yellow, and “Done” green so progress is instantly visible.
- Limit boards: Don’t create 20 boards if 5 will do. Too many boards = chaos.
When I onboard new users, I always tell them: One board should represent one clear project or workflow. If you’re cramming five different projects into a single board, it’ll get overwhelming fast.
Adding And Managing Tasks On Your Board
Boards are empty until you fill them with tasks. In monday.com, tasks are called items — think of them as rows in your board’s table. L
et’s go step by step.
How To Create New Tasks And Assign Owners
Here’s the quickest way to add a task:
- Open your board.
- Click the + New Item button at the bottom of a group.
- Name the task (e.g., “Draft blog outline”).
- Assign it in the People column by selecting a teammate.
Shortcut tip: On desktop, just hit Enter after typing a task name to instantly add another row. This makes bulk task creation super fast.
Setting Deadlines And Priority Levels For Tasks
Deadlines and priorities keep your board useful instead of just being a pretty list.
- Deadlines: Click inside the Date column → select a date from the calendar picker. You can also add a time if it’s important (e.g., “Friday at 2 pm”).
- Priority: If you added a Priority column, mark tasks as High/Medium/Low. I like to color High = red, Medium = yellow, Low = green for instant clarity.
Real-world example: On a content calendar board, I mark tasks like “Publish Blog Post” as High priority and “Update Old Links” as Low priority. It keeps the team focused on what actually drives deadlines.
Using Status Updates To Track Progress Easily
Statuses are more than labels — they’re signals. A status column usually comes with presets like:
- Done (green)
- Working on it (yellow)
- Stuck (red)
Updating a task’s status is as simple as clicking the dropdown and choosing the right option. Over time, you’ll be able to filter or view reports by these statuses, which makes progress tracking a breeze.
Tip: Encourage your team to update statuses daily. Nothing kills a project faster than tasks marked “Working on it” for three weeks straight.
Using Automations To Save Time On Repetitive Work
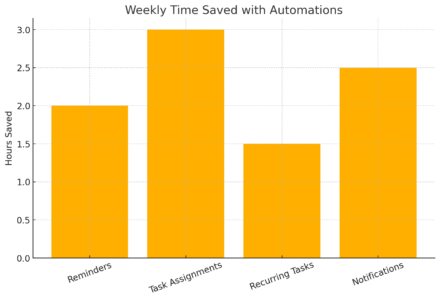
One of monday.com’s biggest advantages is automation. Instead of manually assigning tasks or sending reminders, you can set the app to handle it for you.
Setting Up Simple Automations To Streamline Tasks
To add an automation:
- Open your board.
- Click the Automate button at the top right.
- Browse automation recipes (pre-set rules like “When X happens, do Y”).
- Select and customize.
Examples:
- When a status changes to Done → notify the manager.
- When a due date arrives → send a reminder to the assignee.
- When a new task is created → assign it to a default team member.
I recommend starting small. Too many automations at once can be confusing, but even one or two will save you clicks every day.
Examples Of Useful Automations For Beginners
Some of the most effective beginner automations I’ve seen:
- Task reminders: “When date arrives and status is not Done, notify assignee.”
- Recurring tasks: “Every Monday at 9 am, create item ‘Weekly Report.’”
- Approval workflows: “When status changes to Ready for Review, notify Manager.”
These eliminate the need to nag your teammates. The system does it for you.
How To Edit Or Remove Automations As Your Team Grows
As your projects expand, you’ll want to fine-tune automations.
- To edit: Go back to the Automations Center on the board and click the pencil icon next to the rule.
- To remove: Just toggle it off or delete it completely.
Pro tip: Review your automations once a month. If your workflow has changed, old automations might actually get in the way instead of helping.
Integrating Monday With Other Apps You Already Use
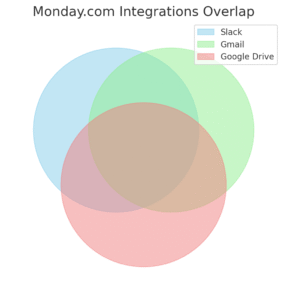
One of the biggest advantages after your monday app download is how easily it plays with the tools you already depend on.
You don’t need to abandon Gmail, Slack, or Google Drive — monday.com integrates with them so all your work stays in sync.
Connecting Monday To Slack, Gmail, And Google Drive
These three integrations are the most commonly used, and for good reason: they keep communication and files in one place.
- Slack: Connect monday.com to your Slack workspace so updates flow directly into chat.
- Path: From your board, click Integrate > Slack > Add to Slack.
- Example: “When a status changes to Stuck, send a message to #project-updates.”
- Gmail: Automate emails based on board activity.
- Path: Integrate > Gmail > Connect.
- Example: “When a due date arrives, send an email reminder to the task owner.”
- Google Drive: Attach files without digging through folders.
- Path: Add a File Column → choose Google Drive as your source.
- Example: Link design assets or spreadsheets directly to tasks.
I believe starting with just one or two integrations makes it less overwhelming. Slack and Drive are often the biggest productivity boosters right away.
Using Zapier For More Advanced Integrations
If you want monday.com to talk to tools beyond the built-in options, Zapier is your best friend. Zapier works like a bridge, letting you create “Zaps” between monday.com and 5,000+ apps.
Some useful Zapier setups:
- Add new Typeform survey responses as tasks on a monday board.
- Log new Shopify orders into a production board.
- Post a tweet automatically when a marketing campaign status changes to “Live.”
Quick tip: Start with one Zap and see how it impacts your workflow. From what I’ve seen, too many automations at once can make it harder to troubleshoot when something breaks.
Syncing Calendars To Keep Projects On Track
Calendar syncing is a must if deadlines rule your world. Monday.com integrates with Google Calendar and Outlook.
Steps:
- Open your board.
- Add a Date Column.
- Click the column menu → Integrate → choose Google Calendar or Outlook.
- Set the rule: “When a date arrives, add event to calendar.”
This way, if a task is due Friday, you’ll see it pop up right on your personal calendar. I recommend syncing only high-priority boards (like launches or client deliverables). If you sync everything, your calendar will look like a Jackson Pollock painting.
Mobile App Features For On-The-Go Productivity
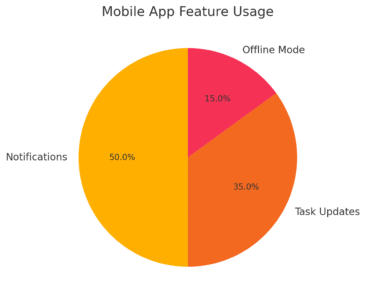
After your monday app download, the mobile version becomes your pocket-sized project manager. It’s not just a smaller version of the desktop — it has features built for on-the-go use.
Managing Notifications To Stay Focused
Notifications are both a blessing and a curse. If you leave everything on, your phone will buzz nonstop.
To customize:
- Tap your profile picture → Notifications.
- Toggle on/off for mentions, status changes, and task ownership.
- Adjust Push vs. Email notifications separately.
I suggest keeping push notifications only for direct mentions and deadlines. This way, your phone alerts are actionable instead of just noise.
Updating Tasks And Boards From Your Phone
You can do almost everything on mobile that you can on desktop:
- Add new items (tasks)
- Change statuses with a quick tap
- Upload photos or files straight from your phone
- Mention teammates with “@Name”
Example: If you’re onsite at a client’s office, you can snap a photo of a signed contract and attach it to the relevant task immediately. That beats waiting until you’re back at your desk.
Offline Mode: What You Can Do Without Internet
The monday mobile app also has offline mode, which is a lifesaver if you’re traveling or in a spotty Wi-Fi area.
- You can view boards and tasks you recently opened.
- You can make edits (like updating a status or adding a new task).
- Changes will sync automatically when you reconnect.
I once used this on a flight to prep a campaign board. By the time I landed, everything synced up and the team saw updates instantly.
Pro Tips For A Smooth Monday App Experience
Once you’ve mastered boards, tasks, and integrations, it’s time to refine how you use monday.com. These pro tips will save time and help you keep everything clean and efficient.
Keyboard Shortcuts To Speed Up Daily Work
If you’re on desktop, shortcuts can cut hours off your week. Some of my favorites:
- Ctrl/Cmd + B → Bold text in updates
- Ctrl/Cmd + K → Quick search across boards
- Ctrl/Cmd + Shift + M → Open “My Work” view instantly
- Shift + Enter → Add a new line in a task without posting it
I always suggest printing out the shortcut list from monday’s help center and keeping it nearby until you memorize the ones you use most.
Best Practices For Naming Boards And Workspaces
Clear naming is underrated but critical. Without it, teammates waste time just trying to find things.
Best practices I follow:
- Keep names short: “Q4 Campaigns” is better than “Marketing Department Q4 Initiatives Board.”
- Use dates: Add year/quarter to project boards (e.g., “Product Roadmap 2025”).
- Avoid duplicates: If two boards have the same purpose, merge them.
Tip: Think of board names like book titles. If someone new joins your team, they should know what a board is for just by its name.
Keeping Your Workspace Clean To Avoid Overwhelm
The more you use monday.com, the easier it is to clutter your workspace with unused boards, half-finished automations, and duplicate templates.
Here’s what I recommend:
- Archive boards you’re not actively using.
- Review automations monthly to keep only what’s helpful.
- Use folders inside workspaces to group related boards.
Example: In one company I worked with, they had 120+ boards. After a cleanup, we cut it down to 35, grouped by department. Productivity jumped because people could actually find what they needed.
✅ Pro Tip: Treat monday.com like your digital desk. If your desk is covered in papers, you can’t think straight. Same goes for your boards. A little weekly cleanup keeps the system running smoothly.
